Nasty Shocks!!!

CAUTION: Maintenance work of this nature should only be carried out by a trained professional mechanic.

This article is published as a guide for the professional, NOT the enthusiastic amateur.


  • Remove shock absorber as shown in the HOME WORKSHOP/Suspension pages on Enrico's site.

  • Compress the spring with a set of spring compressors so it sits loose in it's seating.

  • Remove the top nut by holding each nut with a spanner and turn the spanners in opposite directions.

  • Remove the lower nut by holding the piston strut with a 10mm spanner in the slot (S) near where the wire exits, and unscrewing the nut.

  • Slide both nuts along the wire and over the connector jack. Be careful not to pull on the wire to avoid damaging the connections.

  • Remove the washers and spring.

  • Once all has been removed, secure the lower part of the shock in a vice. Either clamp the eye (rear shocks) or another part which does not involve clamping the main tube (fronts). DO NOT OVERTIGHTEN IN ANY CASE.


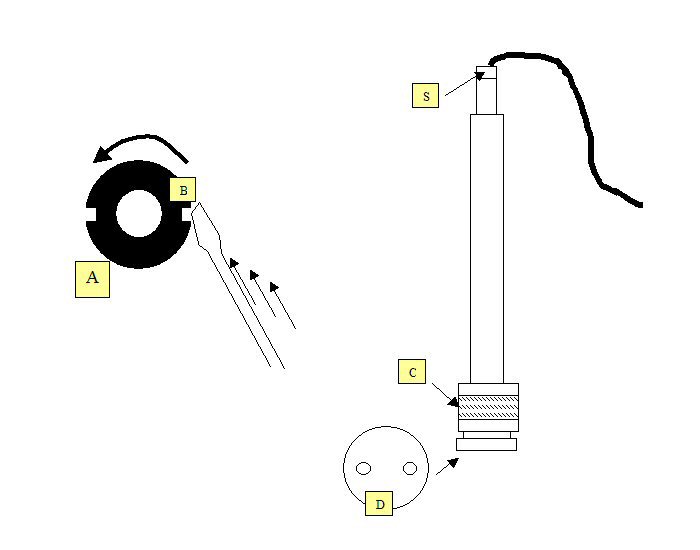
  • Turn the cap (A) where the chrome piston strut enters the shock to unscrew it. Use a tool similar to that used for fixing discs onto angle grinders/cutters.

  • Alternatively place a screwdriver in the slot (B) and tap tangentially to loosen the cap.

  • Unscrew by hand until you near the nitrogen used to pressurise the outer tube, coming out. Leave all the gas to escape before finally unscrewing the cap completely.

  • Lift the piston strut out.

  • Remove the shocks inner strut sleeve. Drain the oil into a container.

  • Replace the various seals including the piston band (C) which is worn out should present a smooth surface as opposed to a textured surface.

  • To remove the washer pack mechanism in the piston, unscrew the cap at the bottom of the piston (D).

  • Once removed, grip the now exposed 8mm nut and pull gently to slide the washer pack out.

  • The washer with an "L" shaped fork coming off the side will engage with the little arm you can now see in the piston.

  • The little arm is linked to the servo through some gearing and will move the washer round to cover some oil passages to increase the damping. When we select a softer damping rate, the servo will move the washer round to uncover the oil passages, hence enabling an easier oil flow past the piston.

  • Perform any maintenance in the washer pack.

  • Make sure than when re-assembling all the washers in the pack, the washer which is allowed to turn (the one with the fork) can rotate freely from all holes covered to all holes uncovered. If not, then loosen the pack, adjust the position of the oil passahge washer and fasten up again.

  • Repeat above operations in reverse to fit washer pack back into piston. Be sure the fork engager with the lever arm connected to the servo.

  • If fixing the shock damping in 1 position, align the lever arm to a position which gives the desired damping (the more holes the fork-washer covers, the stiffer the damping). Inthis case, when you have re-fitted all the shocks, do not re-connect the wires to the control box.

  • PS: There is no need to refill the shocks with Nitrogen as this is done purely for NVH reasons associated with bubbles generated by oil churn.

    o If however you wish to re-charge the outer tube with nitrogen, you need to braise an air valve (similar to those on bicycle tyres or car tyres) onto the outer tube just under the suspension spring seating before re-assembling the shock.

    o The location for the valve should be where you can see a rivet on the outer sleeve which was used to seal the shock in the factory.

    o Make sure the shock is clean from filings before re-assembly.

    o After re-assembling one can charge the shock with approximately 1 bar of nitrogen gas.

  • Once piston has been re-assembled, fit inner shock sleeve back into the centre of the outer sleeve.

  • Fill the inner sleeve to the brim with the collected oil (or fresh 5W fork oil).

  • Add a small cup-full of oil between the outer and inner shock sleeve.

  • Hold fastening cap against the piston and insert the piston in the inner sleeve very slowly, to allow the oil to fill all the orifices in the piston.

  • Making sure the piston is close to the top of the inner sleeve, start screwing on the cap by hand.

  • Secure cap with special tool or screwdriver taps in the slots as was done to unfasten it.

  • Check piston will travel all the way to the bottom.

    o If not, there is too much oil in the outer sleeve.

    o Drain and repeat filling/assembly.

  • Job done.
  •  


    To enter Enrico's Maserati Pages CLICK HERE!

    Copyright: Enrico's Maserati Pages - © 2005. All rights reserved.