| |
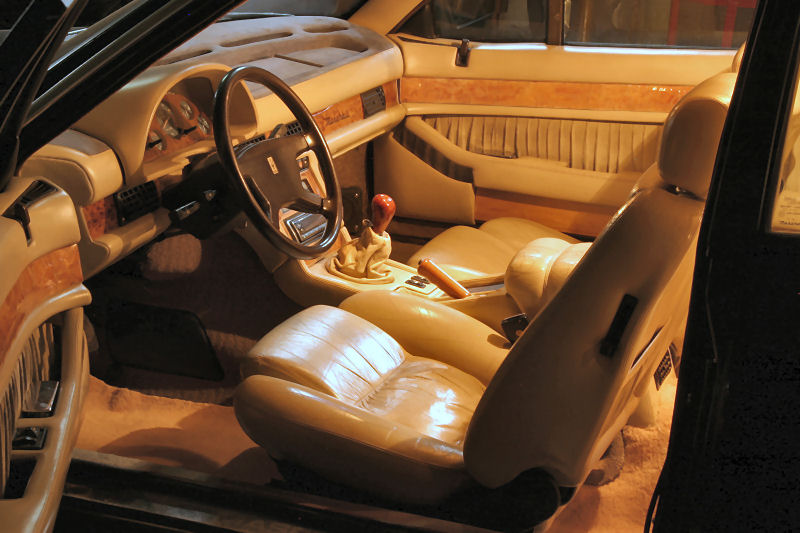
FIRST IMPRESSION
Driving off from the garage of the previous owner directly on to a local highway my first impression was that this car feels like an old tractor! The steering was extremely heavy and the engine was really rough and powerless. I first thought that the prop shaft must be bent, the engine sounded so rough. My friend, his profession being car reporter, was completely correct saying that first impression is usually wrong. Very soon I realized that the engine simply is rough on near idle revs and unlike normal cars which you can easily drive at 1,500 rpm when you are not in a hurry, it just does not give any power below 2000 rpm. After the first time on full throttle above 3,000 rpm I couldn't stop smiling, the engine suddenly wakes up around 3,000 rpm just after a loud turbo whistle tone starts rising at around 2,800 rpm. Still I have to wonder how the Italians have managed to make a 2.8-litre six cylinder engine so powerless and rough on low rpms.
The steering was heavy because the power steering assisted only on very light loads. First you get normal assist for the first 1/8th turn of the steering wheel, then it hits back and you have to start turning with both hands to get the wheels to turn. Any normal turn of the steering wheel resulted in bad belt squeak, nothing more.
FIRST MAINTENANCE
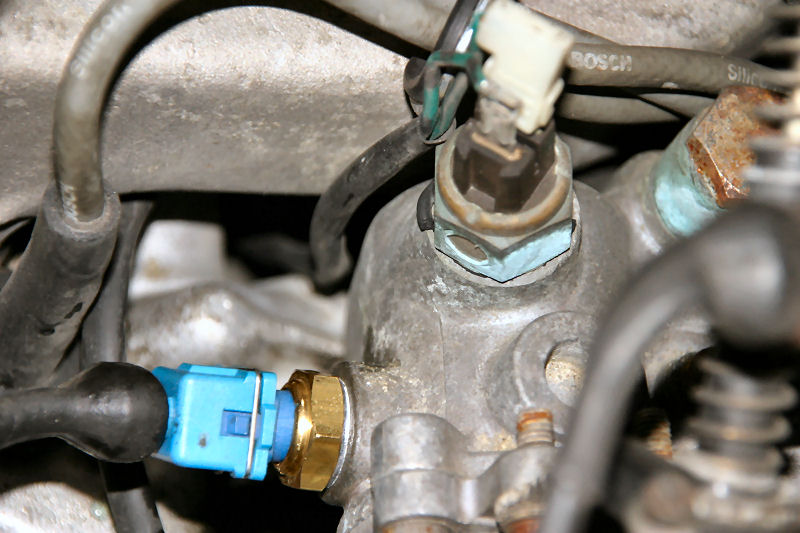
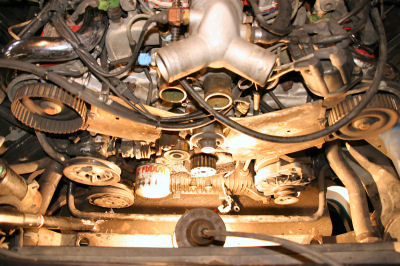
As soon as I got the car to my garage I started to change the timing belt since there was no information about the previous belt change (There was no information about the service history other than the 10,000 km maintenance in a Maserati garage). For a normal car timing belt change would be a quick task but as I had guessed, in a Maser you have to remove the radiator to do that. Once the radiator and associated piping plus turbo piping were off, I noticed that the accessory belt to the power steering pump was totally loose being the cause for the steering problems.
The tightening bolt for the power steering pump was missing and someone had made a tightener for the pump from a long hose clamp so that the pump belt could be tightened from a convenient location. The problem was that the hose clamp was pulling up from the wrong end of the pump thus doing nothing to tighten the belt. The power steering pump has threads into which the tightening bolt originally screws in from the exhaust manifold side - a place nearly impossible to reach with a wrench. Therefore I put a thinner bolt through the threaded hole and a nut on the front of the pump so that the bolt can be more easily tightened when the radiator is in place. The belt had of course worn nearly past identification.
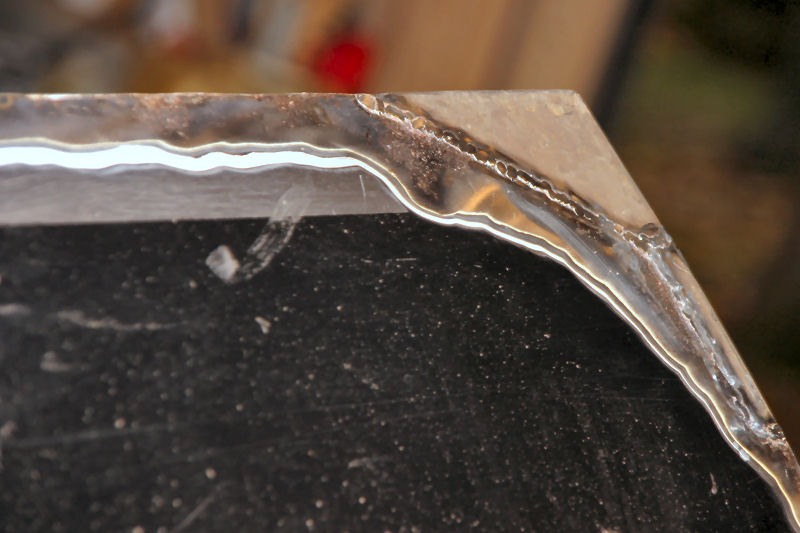
Replacing the timing belt was a straightforward job and couldn't be better timed as the old belt had quite a lot of slack.
Otherwise the engine ran fine, all fluids were clear, power steering now worked and I thought that perhaps now I can just enjoy the car. How wrong was I! |
| |

See how much slack in the power steering belt |
 |
Everything ready for a new timing belt |
| |
POWER STEERING DIED
The power steering died suddenly with a small bang underneath the car. All the power steering fluid was spilled on a parking lot. The reason: a broken seal ring in the steering rack. The original copper seals had been replaced with some soft ones probably because the thread in the banjo bolt were nearly dead and with softer seals leaks could be avoided. I replaced the seals back to copper ones but a local spare parts store didn't have a suitable bolt in stock. Luckily the threads held enough, a drop of fluid every now and then doesn't bother me. These cars always leak oil anyway as long as there is some. |
| |
Broken seal ring |
| |
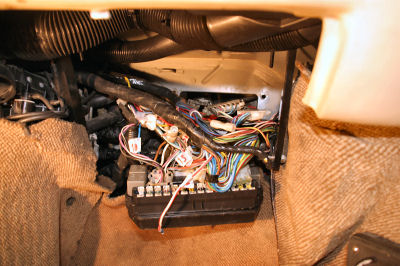
May 2007: THE FAMOUS BITURBO FUSEBOX
I installed a general use fuse box in the engine bay near the battery and re-wired the headlights to it. The headlights had been going on and off when I touched the wires near the original fuse box. Also the horn was not working and the problem was diagnosed to the dreaded fuse box. I discovered that the fuse box had already been replaced at least once and two of the original multi-pin connectors under the dash had been replaced by separate flat connectors. There had been no markings made to the wires so if someone had accidentally pulled many connectors off the box simultaneously, it would have been a nightmare trying to find a correct location to each wire. Therefore I numbered each wire before removing the fuse box. When I opened the fuse box I discovered that the soldering of one relay connector was loose so I soldered it back. Fuse box back in the car and a press to the horn button. Result: a short honk and after that pressing the horn button resulted in a roof light being lit. New wiring bypassing the original fuse box for the horn and roof lights fixed the problem. Both the C-pillar lights also needed repair as they had corroded. |
| |
A cable hazzle |
|
Insides of the fusebox |
| |
While putting back the fuse box I had noticed that sometimes there was contact problems in the main power supply to the ignition lock. This was solved by shaking the connectors in the fuse box. Washing the engine bay also resulted in starter solenoid problems which I first thought to be in the fuse box as well. A solenoid stuck in on position is very annoying because then the starter won't stop before you pull the battery cable off!
MINOR PERFORMANCE IMPROVEMENT
I installed a Bosch blow-off valve from a Saab that I bought for 20 . Helps the turbos to spool up quicker after a gear change. Downside is that now the distinct whistle caused by turbines stalling after lifting off throttle is gone. The blow off valve prevents a pressure surge between the turbos and the throttle body after throttle flap is closed. This allows the turbos to spool longer and boost pressure comes up quicker.
AC PROBLEMS
Back on the road for the first high temperatures of the summer. What a surprise, the air conditioning compressor was not kicking in as it had when I first went to see the car. My first thought was that the refrigerant had leaked. To my surprise it hadn't so there was something wrong with the electrics (again). After two hours of closing out all possible except power going to the compressor clutch I found that a cheap electrical connector underneath the compressor had gone loose while tightening accessory belt. Would have been a five minute job just to fix it.
June 2007: CAR DIED ON THE ROAD
Two days after the ac was fixed I decided to go driving to see if it was working properly. First tight turn made the car completely dead. Heavy twisting of the wiring loom near the fuse box finally restored power but the air conditioning unit had died. I stopped at a roadside parking lot and started to search the fault. Luckily it was only a melted fuse, but again I had serious trouble to get the main power back on to get the car running. Once I got the electrics to function I decided to drive a stretch of gravel road. Boy was the car scary on gravel! When the turbos kick in, you loose all the traction at once even on third gear at 100 km/h.
The rest of the drive pointed a slight worn bearing -type whine from the rear and sticky first and reverse gear engagement. The reason for the whine was located to a slightly slacky right rear wheel bearings which proved to be impossible to tighten before a socket is made for the special slot nut. There is plenty of space and there could be a regular nut in the axle but no. Italian logic again.
The main power problem was again with the fuse box having contact problems so bypass-wiring to the engine bay fuse box was again the cure. Most Maserati owners simply buy a new fuse box to fix the electrical gremlins. But that does not fix the problems for good as the box simply isn't up to the amps going through it. For that reason my approach is to re-wire all non-operating stuff to a self installed fuse box so that there is no chance for the same problem to occur again.
Other events from that week were a broken driver door handle and a flat tire. The tire was easy. I fixed it with soudaseal rubber-like glue injected into the found nail holes. Good news were that the spare tire had air in it and the lowering mechanism and the original jack worked. For some reason the spare wheel is different from the others. It has more offset i.e. the tire sits deeper in the wheel well which looks quite silly.
The door handle has a small ball joint which had come loose from the handle. There was no way to make the press-in joint stay in the handle again so it was replaced with a 4 mm screw. While the door panel was off, I also decided to fix the door courtesy lights and while at it, also the right hand side power mirror. The lights simply had oxidized contacts but the mirror had to be put apart because the wires inside the mirror had been pulled off. The reason for the disconnected wires was that the right hand mirror was connected to the wrong connector in the switch controlling both mirrors. For some reason the switch (same in many Lancias) has two left hand side connectors. The both mirrors were thus moving simultaneously when only the left hand side should have been moving. The cure was to simply change the right hand side mirror wires to the correct connector. It was interesting to note that the door panels are made very well: under fine leather is a strong glass fiber board instead of the cheap fiberboard usually found in door panels. The mountings however are those usual cheap plastic ones found in cars like Fiats. Same contrasts exist all over the car. Some parts are very high quality while others such as the fuse box are quite the opposite. |
| |
The insides of the driver's door |
|
A 4 mm screw replaced the tiny ball joint |
| |
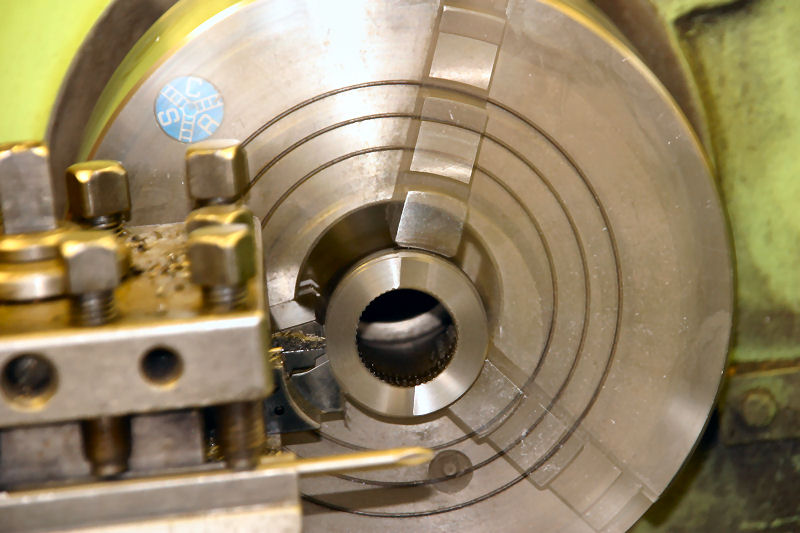
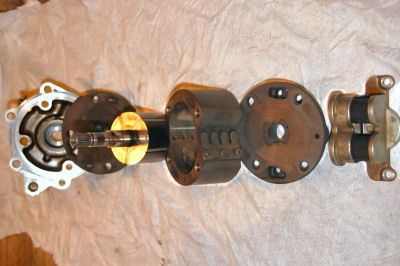
TRANSMISSION DAMAGED
All electrics were fixed only to notice that the first and reverse gear got more sticky each time heavy throttle was used on first gear. Finally a full throttle acceleration stuck the first/reverse completely. Even pulling with two hands neither would engage and opening of the transmission was evident. The last six paragraphs are from events during one week period and approximately 100 km's of driving so during that week all I did was fixing the car just to find the next problem. Not much money spent though. Would be a completely different story if I had taken the car to a specialist instead of doing the work by myself. I believe this way the fixed electrical problems will never come back as they would if simply a new fuse box would have been installed.
Taking the transmission out of the car is a very time consuming process because of the amount of stuff required to take off before the transmission can be pulled off. These include air cleaner and fuel piping going through it, the steering rack and at least one side of the exhaust.
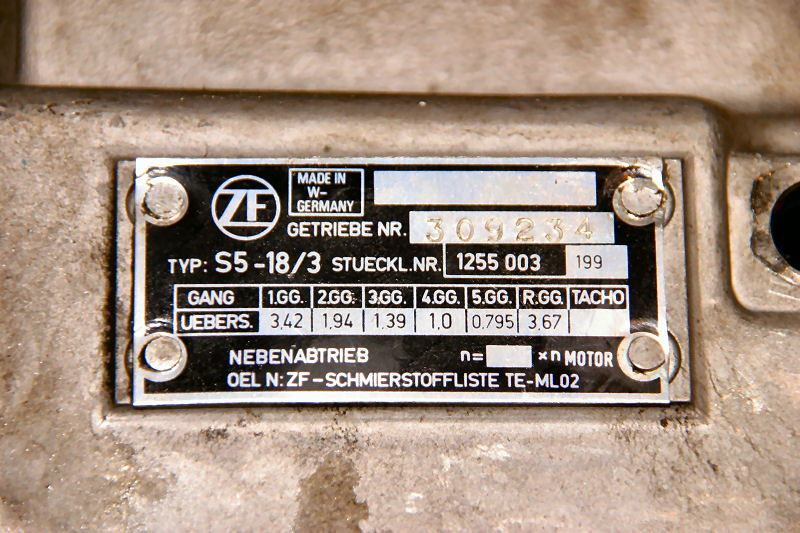
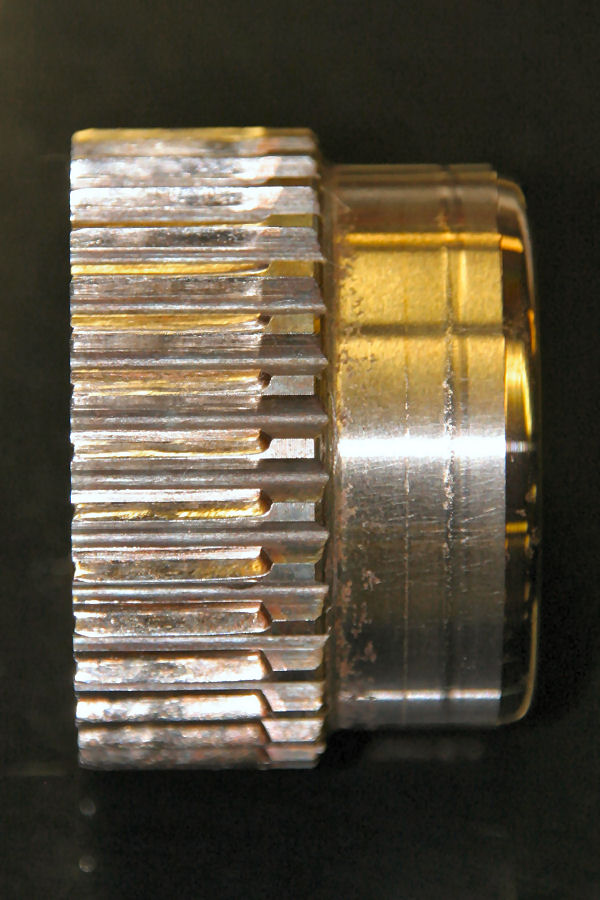
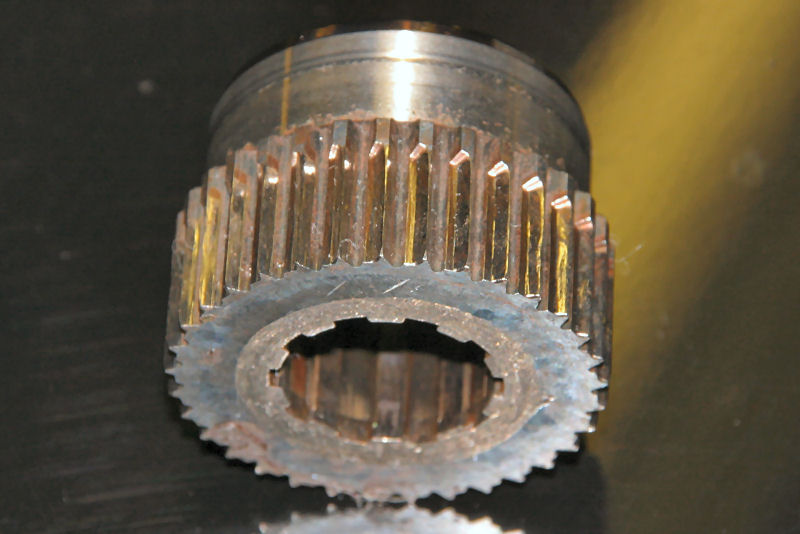
When the transmission was finally off, pulling it apart was relatively simple. Simultaneously I searched online information about the transmission because whatever was broken inside I didn't want to replace it with a part from a Maserati source. I found that the ZF S5-18/3 transmission has many derivatives which had been used in many applications, mostly quite rare cars such as Alfa Romeo Montreal, racing models of Ford, Opel and BMW, Volvo army offroader and Iveco Daily van! The transmission dates back to early seventies or even late sixties and excluding Maserati, no one else had used it until nineties because it is quite heavy to operate and thus an outdated model already in the eighties.
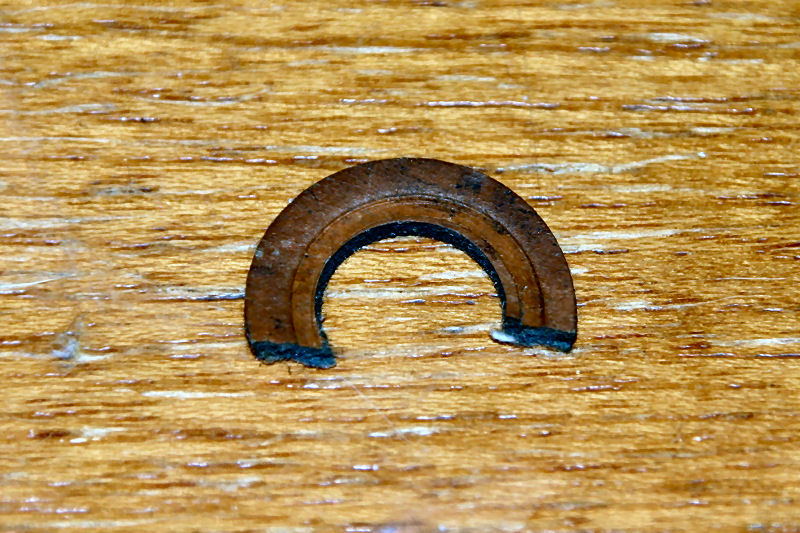
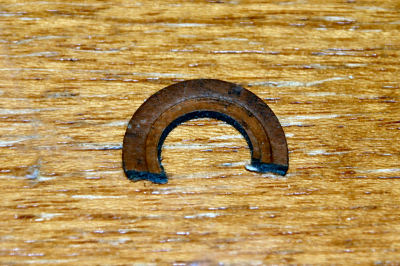
Once the gearbox was apart the problem was clear: The synchro hub for the first/reverse gear had been shattered into four pieces. Eurospares has a price for it on their website although they do not have it in stock: £151.15 which I think is quite a lot for a simple cast steel ring. MIE was asking $354.73. Also, I filled an inquiry form on ZF website and to my surprise, three weeks later I received an email from a Finnish company Atoy Oy, a local ZF representative, asking for the Stueckl nr. printed on the transmission number plate so that they can source the correct spare part. I gave the number but mentioned that I already had a spare part (read the next paragraph) but would be very interested to hear a price estimate. Understandably no reply since. |
| |
The broken synchro hub |
|

Brittle fracture I would say |
| |
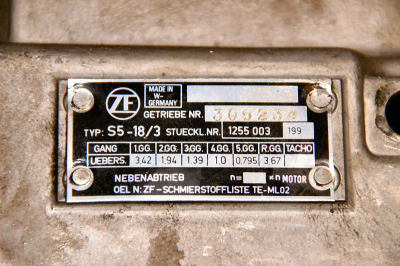
Identification plate on the transmission
|
| |

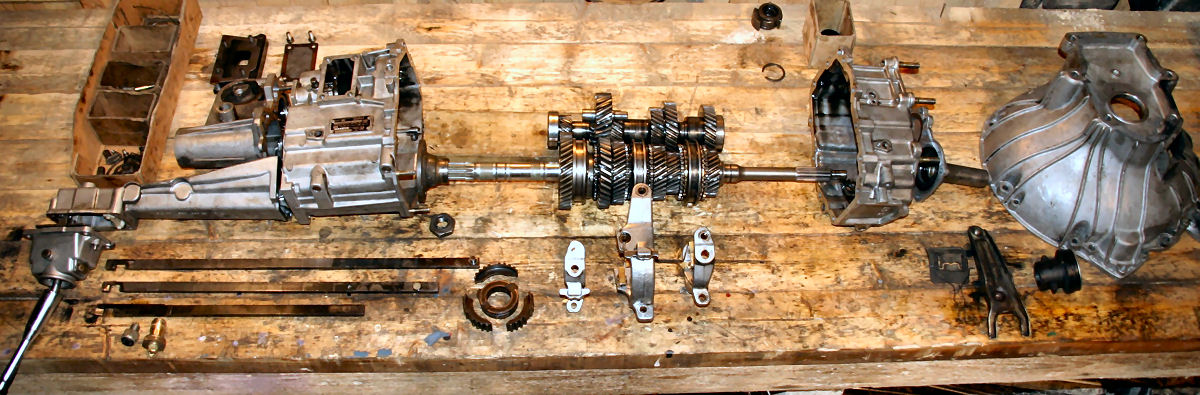
An exploded view of the ZF manual transmission |
| |
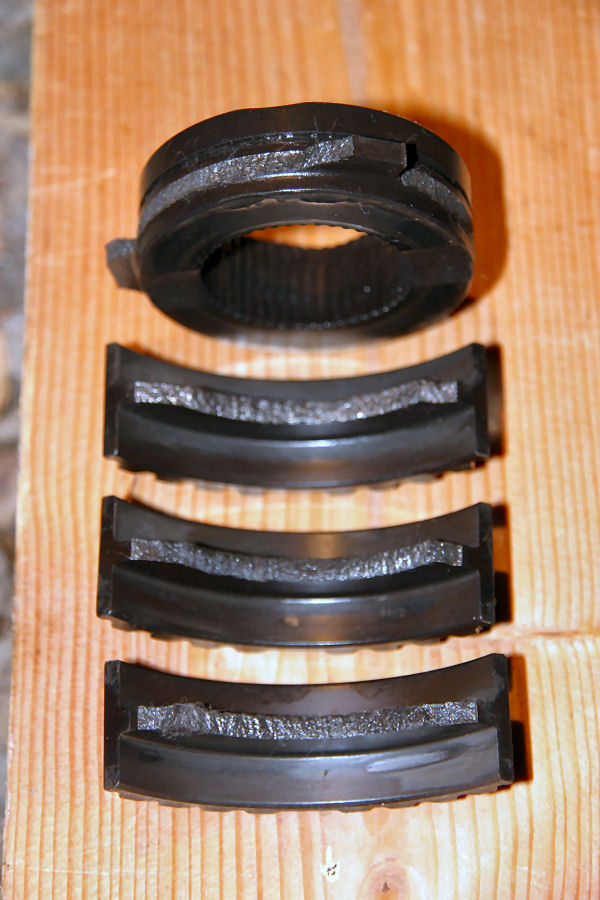
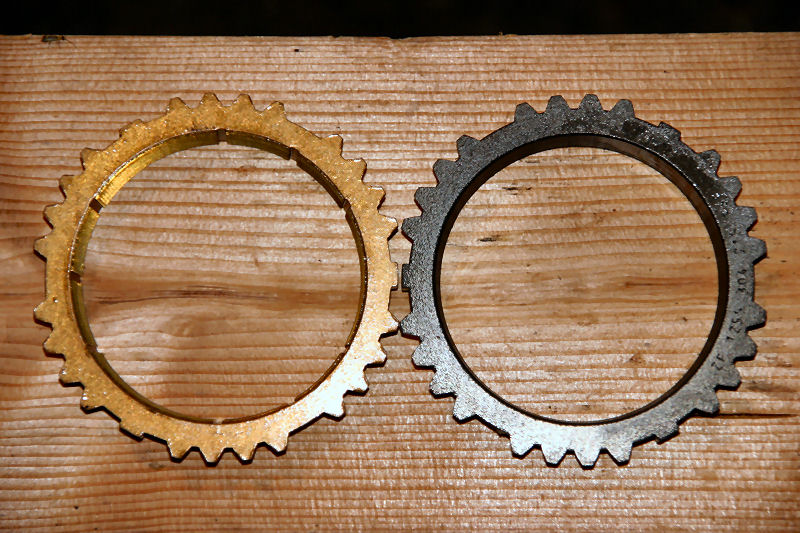
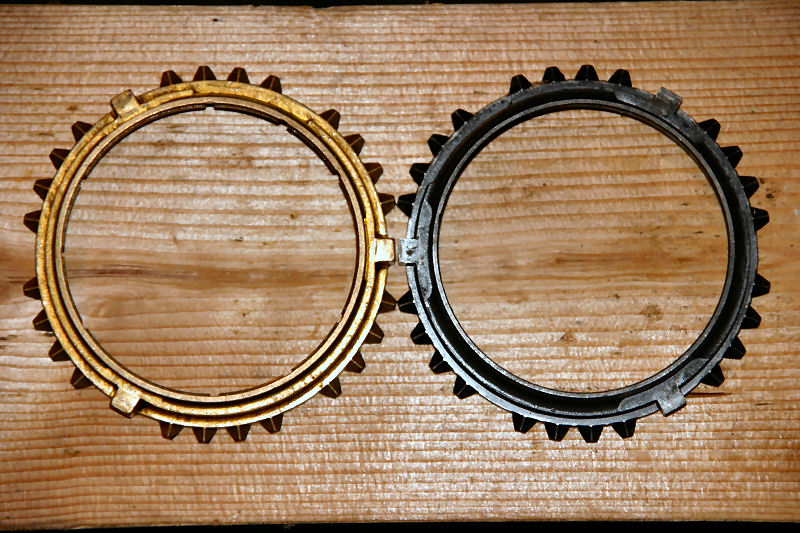
Because the transmission had been used in rally cars I started calling racing shops who modify gearboxes for rally use to find out if anyone had saved stock parts from such a gearbox. All had the same answer: If they had received the original insides, they had been thrown away! Luckily one shop owner knew a guy who was track racing historic BMW:s. The man, Upi, remembered that he had one four speed version from a 70's BMW which only missed the prop shaft flange. When I went to see him he had the box already apart and we discovered that the hub had the same splines and outer teething but the center of the hub in the Maser hub was 2 mm offset from the center. Therefore some machining and a spacer to the other side was necessary to make the part fit. Because Upi was willing to sell the whole box for 110 I bought it and also got a phone number to a person who had a lathe in his home garage. I got the hub machined to suit and a spacer cut from the old hub. The guy with the lathe was asking 10 for the job and I wanted to pay 50 so I had to agree for 20 :) Thus total spare part cost including fuel was 140 . Now I also have three practically unused synchro rings (the four speed was nearly unused for some reason) to sell someone with a worn out biturbo gearbox. Prices for the new rings are more than I paid for the entire gearbox. There were four rings but I decided to put one to my box since the fourth gear ring was quite worn out although the gearbox had been working fine. The Maserati gearbox has different material for the 1st - 3rd gear synchro rings. Dimensionally they are all same as you can see from the images. Perhaps ZF has attempted to make the gear change smoother (unsuccessfully in my opinion). The 4th/5th rings have more slots than the 4-speeder rings. There proved to be no difference in the operation however.
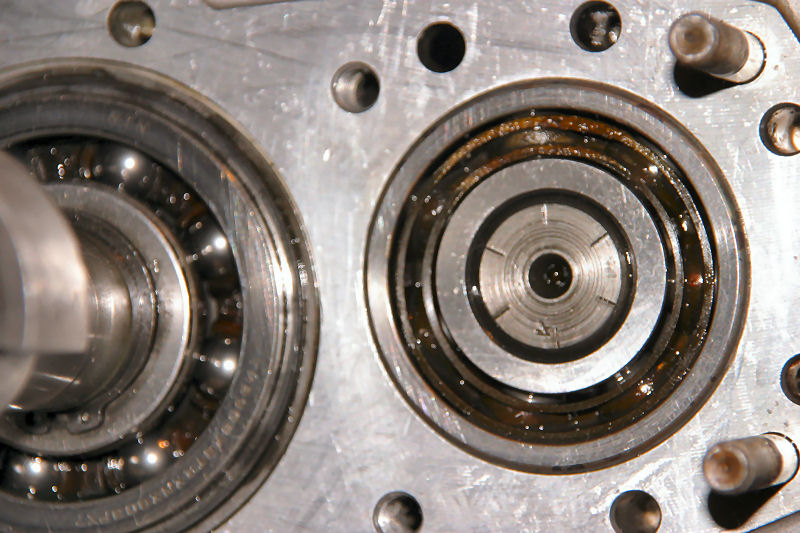
Comparing the synchro hubs Upi noticed that the broken one had a bluish color indicating overheating during assembly. There were also dents probably due to hammering the hub into place. These might be the reasons for the hub to get broken with better gripping oversize tires (225/60 R 15 installed by some previous owner). As Upi noted, this transmission is a very durable piece and takes all the abuse of racing without any modifications. I haven't find anyone that has broken this gearbox. If someone has I would be interested to hear the story. Why the transmission had already been opened once, remains a mystery as well. One lay shaft bearing had rust on the ball guide which puzzles me as well. Maybe the ZF assembly plant had a leaky roof :) There was no slack in the bearing so no point replacing it. |
| |

Machining the spacer |
|
Rusty bearing |
| |

Ring from the BMW box left. First gear ring right. |
|

As in previous image |
| |

Original ring on the first gear cone |
|

Ring from the BMW box on the first gear cone = exact mach |
| |
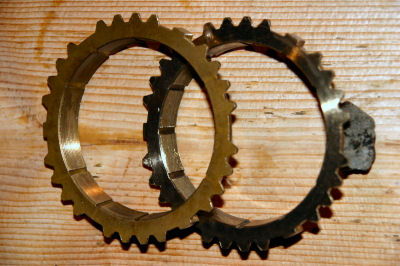
Ring from the BMW box left. Original 4th gear ring right. |
|

The three rings for sale (SOLD!) |
| |

The same three rings |
| |
July 2007: REPLACING THE TRANSMISSION
Putting the tranny back together was quite uneventful. The paper gasket between the housing halves was replaced by loctite liquid gasket and all joints greased. The assembly back to the car was as time consuming as the disassembly. In together it took approximately five full days to get everything done. A similar job on a Ford Sierra gearbox I have done in a day!
The box was filled with 75W 80 API GL4 transmission oil from Total instead of the recommended 80W 90 API GL3. The oil is thinner than the recommended but with better lubricating properties. It was the only oil I found from a local spare parts market that was meant for manual transmissions. Never put normal gear oil to a manual transmission if you want easy operation. A normal gear oil fulfilling higher API GL5 requirements has high pressure additives so the oil lubricates too well. This would prevent synchros from grasping the gears as they are supposed to. The transmission seems to like the thinner oil. The gear change is much better than before, almost like a normal car!
End result: a fully working gearbox with half the costs for an original part. The car was out of service for a full month (although a 10 day trip to France was one interruption during that time). Luckily it was summer time so my 1965 Ford Galaxie took good care of my transportation needs.
STARTING PROBLEMS
Few days after the gearbox was completed starting problems began on the way back from an Italian motor vehicle event. It was again the solenoid this time stuck on off so that occasionally there was nothing happening when turning the ignition key. I took the air filter box off to reach the starter and sprayed some WD40 on locations on the solenoid where it seemed to be possible that it would get inside the solenoid. No solenoid problems since. The battery however died soon after so it also might have been a problem with low voltage.
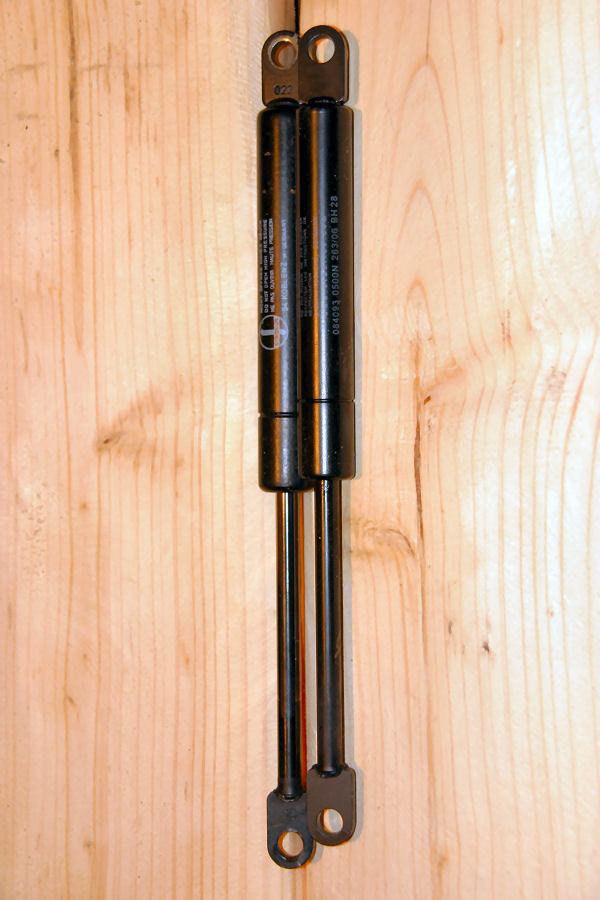
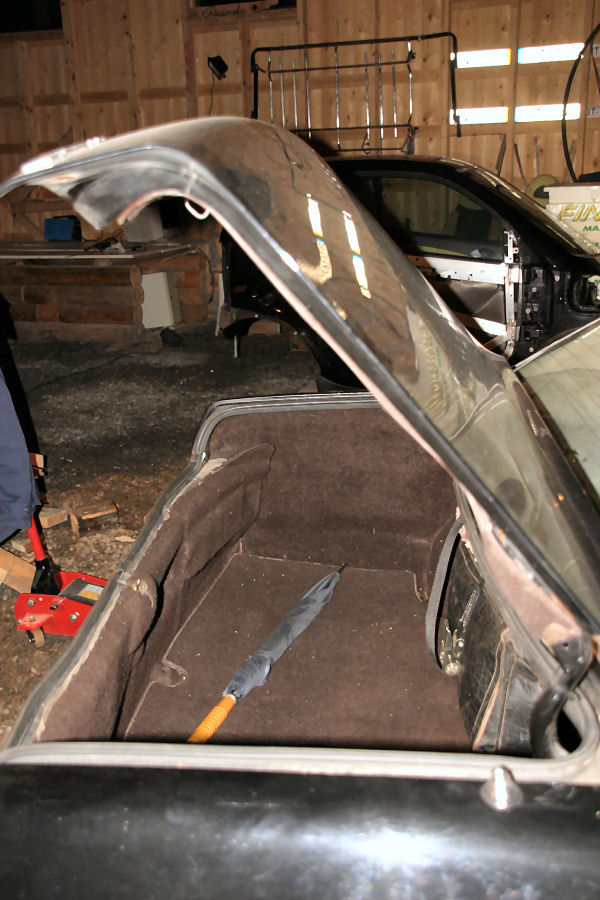
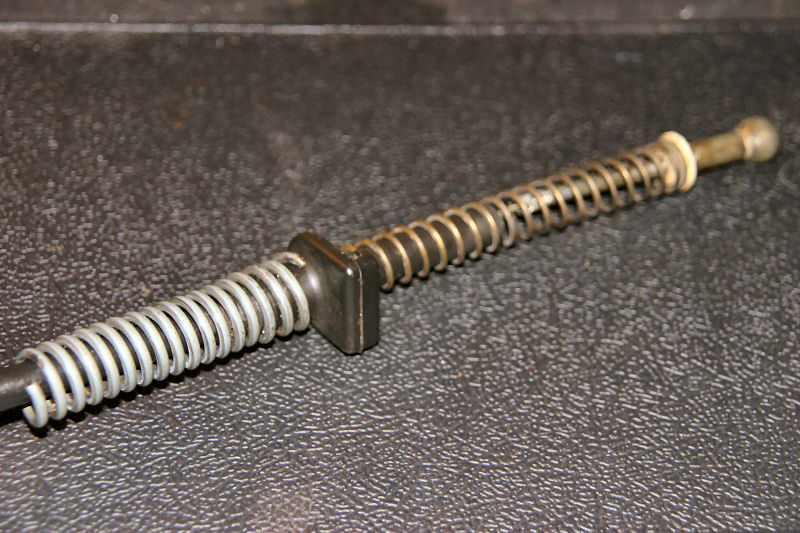
August 2007: TRUNK/BOOT LID GAS SPRINGS
I thought that it would be easy for the local spare parts store to order new springs according to the dimensions. For some reason the owner of the shop couldn't find any from the Stabilus catalogue (perhaps he was too busy his assistant being on holiday) so he promised to call the stabilus representative. Couple days later I went to ask for the results: The springs 228:s have were made solely for this model, even all other Maseratis have different springs! The price was around 60 each and although the factory in Germany had three pieces in stock, the delivery time would be around seven weeks. What can I do I thought and asked to order them. As soon as I went home I had to check online for more info. What did I find: Stabilus catalogue had standard range springs with matching dimensions and force. Perhaps there are some difference in the damping properties but all dimensions were the same. I called back to tell what I had found and the shop owner admitted that he should have spotted those in the catalogue and that the price for those was around 30 each so these were ordered instead of the originals. I guess it's possible that the standard springs had not been made in the 80:s so a special model had been made for Maserati.
GEARSHIFT RATTLE
What I have read, rattle in the gearshift is not a fault but a property in biturbos. Mine had only had very occasional rattle on third gear until it suddenly started to rattle terribly on all gears and even at neutral. The cause: gear knob loose. Rattles disappeared by tightening the small screws on the knob. This might prove my theory that the rattles can be cured in all biturbos although all I have heard is just to live with it. Usually cars have a rubber joint in the shifter so that there is no metal connection between the gearbox and the gear knob. In biturbo shifter there is a some sort of plastic one. My guess is that slack in the plastic joint or in the gear knob causes the shifter to rattle. So if you replace the joint with a rubber one the rattles should be gone. I guess you could just remove all plastic pieces and fill the cavity with liquid rubber and allow it to set long enough. It might even work just to leave plastic bits in place and fill remaining empty space with liquid rubber. Before that it might be worth driving the car with the knob off to make sure it's not just the knob rattling loose on the shifter. Rubber joint unfortunately decreases shifter accuracy which is the reason why this sporty car does not have such originally. I have experienced this rattle problem before because years back I modified a Sierra shifter for sportier feel so that the gear knob did not have so wide movements. This also required welding the shifter solid. Not a good idea because this caused the self made walnut wood gear knob to rattle occasionally.
RUNNING PROBLEMS
The engine had few hiccups on the highway probably again due to some electric problem. Possibly for the same reason it once refused to start at first and when it finally did, it required full throttle for the first second to run. It sounded like it was running on three cylinders for that first second. After that it ran fine. The next week the engine died while rolling downhill on neutral. Starting attempts once fired the engine up for a second. I popped up the hood and shook some cables to try to find a contact problem. This didn't help at first, but the next turn of the key made the engine back to life although I hadn't touched anything after the failed attempt. The engine ran fine and no problems remained. It is quite hard to diagnose a problem that comes and goes. Just to be sure I opened the distributor and cleaned minor oxidization from all contact surfaces but obviously that was not the problem as the car had hiccups afterwards.
POWER STEERING LEAK
The leak in the power steering had gradually gotten worse and finally I had enough. As I had suspected, tightening further the banjo bolt broke the bad threads completely so a new bolt was needed. The local spare parts store didn't have a suitable bolt and neither did a local garage although it had the most common hydraulic connectors available. The person in the garage didn't even know what a Maserati is! Luckily the correct bolt was found in a hydraulics store. Price: 0 . They said it would cost more to make a receipt than to just give it for free! |
| |
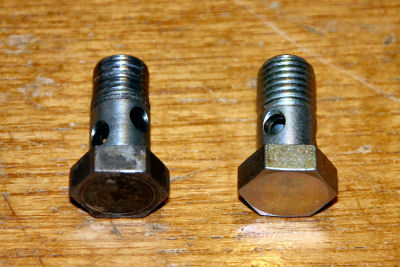
The broken banjo bolt and a new one |
| |
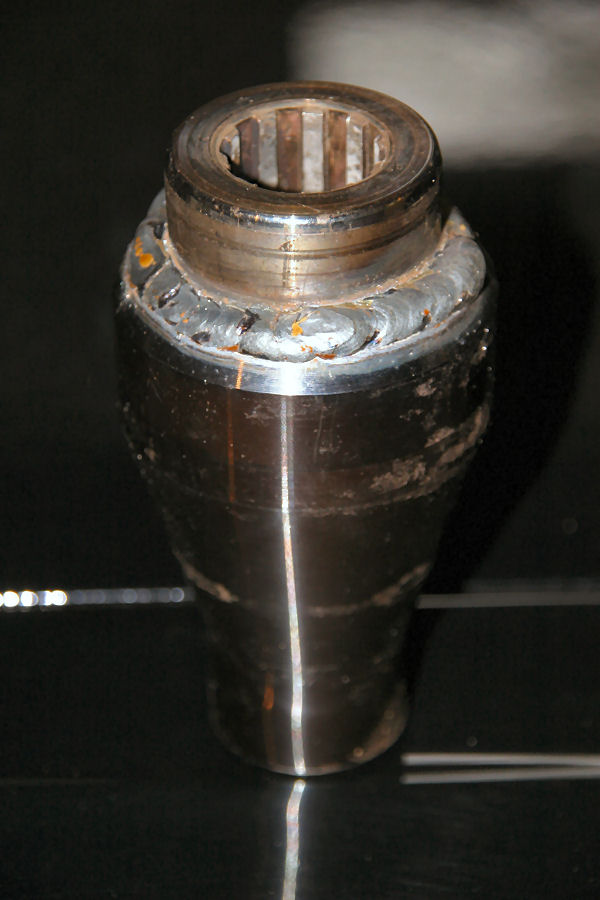
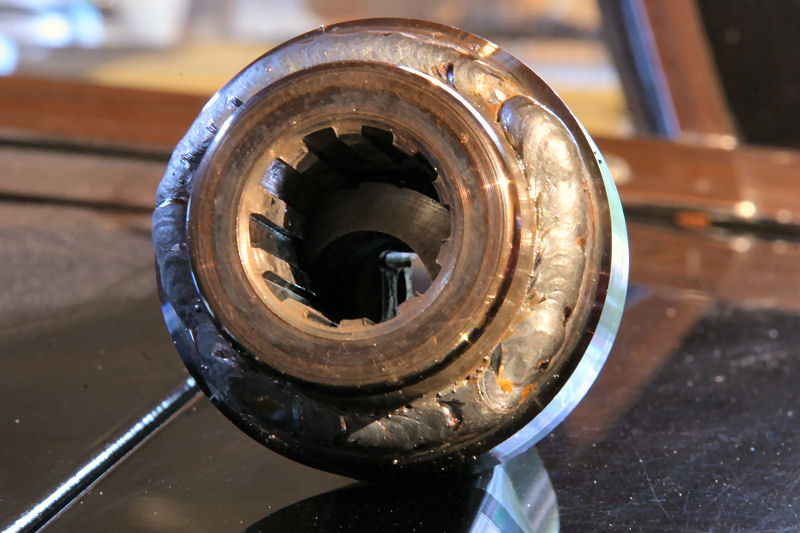
September 2007: WORN-OUT DIFFERENTIAL SPLINES
Again a design flaw by Maserati required work. This time as a preventive maintenance. Splines in a coupler and union in the diff extension wear because they are not tightened to each others in any way. When the parts wear it causes a clonking noise when lifting off the throttle and when pressing the throttle again. According to the maintenance manual this coupling should be glued with locktite to prevent movement between the parts. This had been done as there were traces of locktite in the parts. The parts had worn out badly, the brittle glue was mainly gone and the increasing slack allowed even faster wear. Two thirds of the spline's width had already worn out. I decided to glue the coupling with a Soudaseal rubber-like glue and hope the parts will not move and wear anymore. The soudaseal should not crack into tiny pieces which then fall off. The risk is that it just gradually fades and falls off in crums. Time will tell if it will last. If the splines finally break, I'll have to buy new 180 parts from Eurospares or have new stronger parts made. Luckily changing the parts is an easy job just taking a couple of hours underneath the car. |
| |
| |
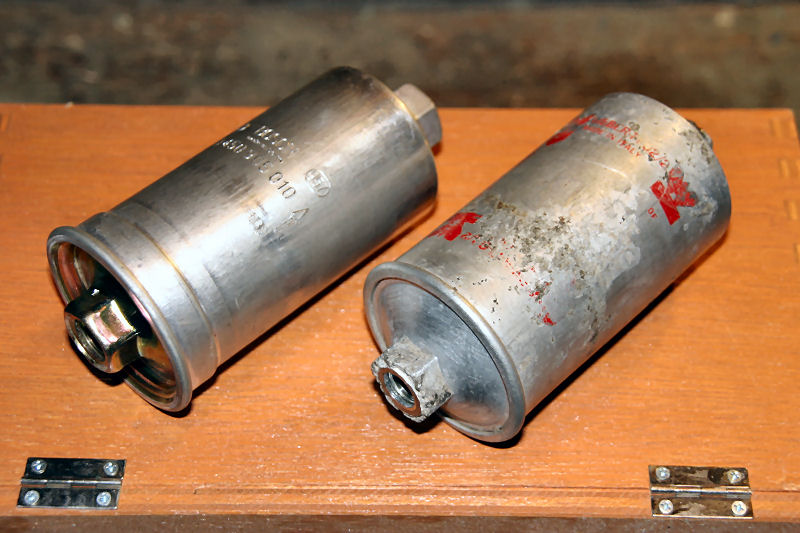
October 2007: OIL CHANGE
Even an oil change wasn't a quick task in a Maserati. Well, it would have been if the space for the oil filter would be larger. The oil filter model used in 2.8 Biturbo engines is not a stock item in Finland. However a very similar was found according to the dimensions that fits many applications such as most rear wheel drive Volvos. I bought one and took off the old oil filter to find out what's the difference. It turned out that the outer diameter of the filter was slightly larger, not much but enough for the filter to scrape the oil pan. At least now I had the part number of the old oil filter: Fiaam FT 5103 which also turned out to be a common filter used by Ford, Lada and Renault to name a few. Back to the store to get this filter which in M filter's range is MH 325. I guess Maserati is the only application where it matters but this filter was aswide as the previous longer one tried, several millimeters wider than the equivalent Fiaam filter. Back to the store for the third time. This time a narrower filter with matching thread and gasket diameter was chosen. Used mainly by Ford in smaller engines up to 1.8 liters the MH 362 was narrower than the FT 5103 but longer. It fitted perfectly. This filter also goes by the sway bar easier than the previous one. Although I had to buy two filters because I scraped the first one it was still half the price for an original oil filter. |
| |

The MH 315 was too wide |
|
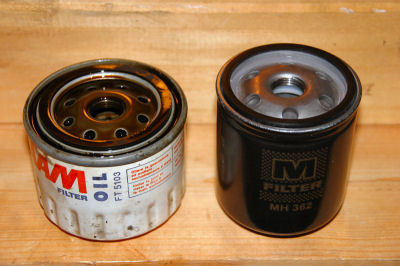
The MH 362 fits just great ! |
| |
All well except I should have made sure I own a 17 mm hex key for the drain plug before I took off the oil filter the second time...
SOME MINOR ELECTRICAL REPAIRS
In 1989 new cars were required to have driving lamp washers in Finland so such system was installed in my car by the dealer. To get it back to work I had to replace two oxidized connectors and order a new relay.
To replace a license plate light bulb quite brutal plier work and some light hammering was necessary to release the old bulb which was very tightly in the rusted socket.
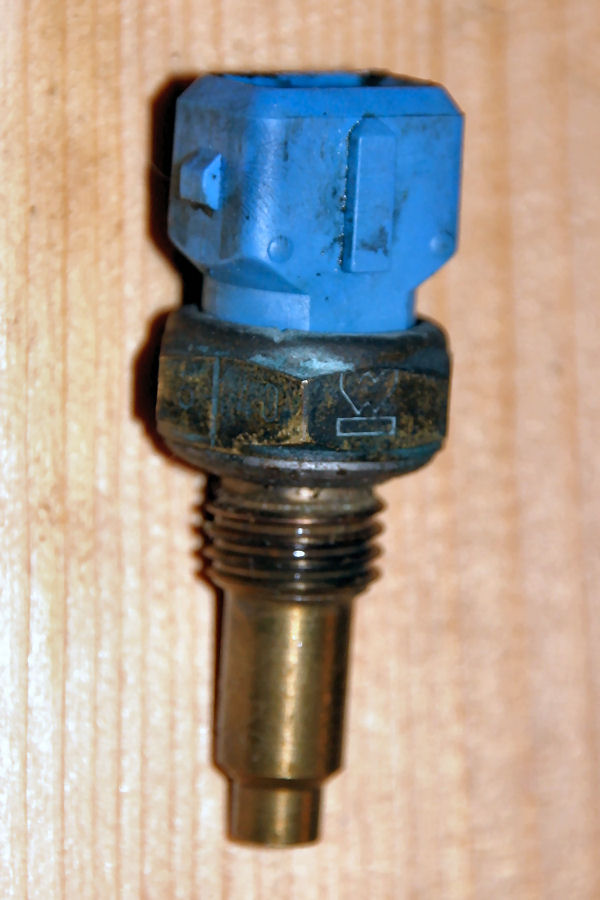
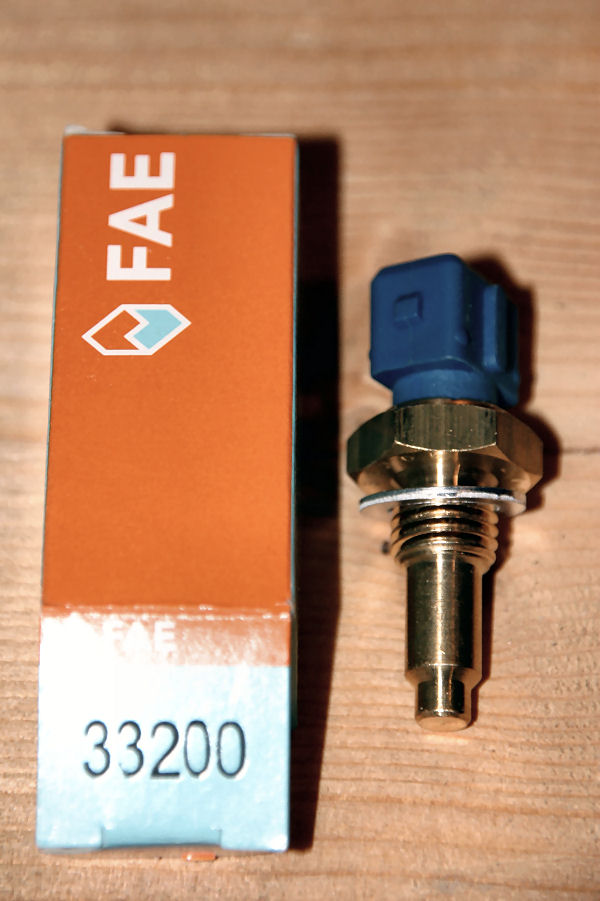
November 2007: COOL ENGINE
Cooling system designed for Modenese summer does not work optimally in Finnish autumn. Since the coolant thermostat is set at 70 °C it is very cold for a road car. The heating capacity however seems to be sufficient at freezing temperatures but the engine has difficulties in reaching 70 °C on highway speeds. In urban driving it does that although it takes quite a while. The problem caused by that is that the engine management thinks the engine needs fuel enrichment even after an hour of highway driving. When the car was built fuel consumption was not the first concern for the owners of these cars, not to mention emissions. Therefore unlike in modern engines the fuel enrichment is kept on up to normal operating temperature just to be sure there is no running problems when the engine is warming up. It is also possible that the new temperature sensor has a slightly larger resistance than it should. After all, it is made in Spain. I did not want to put in a higher temperature thermostat because it would also have required changing the fan thermostat and also because it might increase the risk to crack or warp the fragile cylinder heads. Despite that I wanted the fuel enrichment to go off at lower temperatures. Not only to save fuel but also because too rich mixture causes part of the unburnt fuel to be absorbed into the engine oil.
Mechanical engineer's solution to reducing the enrichment cutoff temperature was not the most logical one of reprogramming the engine management. I simply don't have the skills nor willingness to learn to do that. For me it was much easier to fool the engine management. Because the temperature sensor has a resistor in which resistance decreases when temperature increases, connecting a resistor parallel to the sensor makes the engine management to think the engine is running hotter than it actually is. 2 kO resistor made the enrichment cutoff to drop to around 65 °C. Otherwise very good but the temperature sensor having an exponential resistance increase with decreasing temperature made the management to think the engine was always at least half warm. What I needed was another temperature sensor parallel with the original one to get the higher enrichment at startup. Otherwise I would have had to tolerate quite bad running for the first minute.
I bought a 5 temperature sensor (I think for a Ford Sierra water temperature gage) and connected it parallel to the original water temperature sensor and in series with a 1 kO resistor. The extra sensor has a snug fit between the thermostat housing and intake manifold. Not a very professional installation but it works perfect! This setup made the enrichment and high idle to cut off at around 60 °C. The higher enrichment keeps on around two minutes after startup. Easy start, no bucking or stalling whatsoever.
LAMP WASHER RELAY
The spare parts dealer hadn't ordered the washer relay. The reason: price tag of more than 60 ! I had to agree that he had made the correct decision.
I was already planning to put a switch to the dash but decided to have a look at the relay once more although my electronics skills are nonexistent. After quite a while I noticed the obvious cause which I should have spotted in a minute: One lead on the circuit board had oxidized away from a one centimeter distance. I soldered a wire to reconnect the circuit and voilá! problem fixed. The relay gives a short squirt on the lamps every time windscreen washer is used if the driving lamps are switched on (which in Finland is always by the law).
December 2007: STARTER RELAY (twice)
On several occasions the starter worked only after several key turns and finally refused to work at all. Of course that happened when I was in a hurry.
Luckily It only took a minute or so to start the engine from the engine compartment. The wire to the starter solenoid goes by the battery positive terminal and there is a connector in the wire. You can start the car with a piece of metal (a house key was perfect for that) by connecting the wire to the battery. The problem was simply the relay. It made the normal click but the contacts had gone bad. The contacts were fixed with sandpaper but only for a while. On the way to spend the new year at my friend's holiday cottage the relay stopped working again. Luckily I had a spare relay in the trunk which fixed it.
TO DO LIST
Excluding the starter relay issues, the car was reliable as any car for most of December. For an average driver a car that refuses to start every now and then would be more or less intorelable but for me... well so far I have always managed to get the car going. It certainly is a joy to drive a Maserati daily, especially driving in snow is a lot of fun. I degrade to a mental level of a child and drive sideways as often as possible much to the annoyance of my spouse. It's amazing in how little space you can do a U-turn when you have a limited slip differential. Although the car has worked great, few knicks had developed that need attention when the time was available. The clutch master cylinder developed a leak which caused the driver footwell mat to be soaked in brake fluid. Another bad news was that I hear clonks again from the rear end.
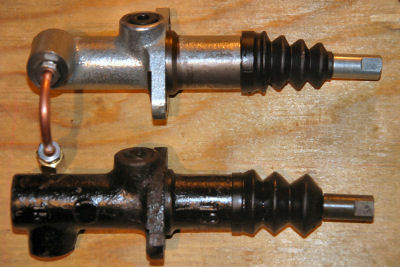
January 2008: CLUTCH MASTER CYLINDER
The clutch master cylinder leak got worse every minute so I had to get it fixed right away after the holidays. The location of the cylinder is neatly behind the strut tower as unfortunately tight as so many things in this car. As in many cases with Biturbos the best person to uninstall the cylinder would be a gynecologist rather than an engineer. |
| |

Generous space for the clutch master cylinder |
| |
After I got the cylinder off, I did not first notice the obvious cause for the leak. The rubber parts were all ok but after examining the cylinder closer there was little corrosion in the cylinder wall just where the outer rubber seal stops. The photo shows it much better than what a naked eye can see. |
| |

Corrosion in the cylinder wall |
| |
What I needed was a new cylinder so off I went to the local spare parts shop after some study at Yahoo's Biturbo Zentrum discussion group. As I have gotten well aquainted with the shop owner during the months I have owned this car, the discussion at the shop went the following way:
I laid the cylinder on the counter saying: "I guess you have plenty of these on the shelve..." The shop owner with a joking grin: "why, sure" Then turning to his colleague: "How was it, did we just had to move all our Maserati clutch master cylinders to our main warehouse in Helsinki" The assistant with an even wider grin replied: "So it was, you see we had so many of them that we ran out of space here." Laughter from both men. (Remember it's a small two men shop in a rural village whose only warehouse are the few shelves behind the counter) The owner turning back to me: "I hope you have a good tip of what might fit this time to that Maserati of yours."
I must say the service in this tiny shop is excellent. I had read that the cylinder for E21 BMW should fit but I wanted to be sure so the shop owner called to the national supplier and asked a product photo which he promised to email me once he got it. I got the photo an hour later and was happy to call back to make an order because the cylinder seemed to fit. They promised me the cylinder would arrive on Tuesday (I ordered it on Friday afternoon) and that's exactly what happened.
The only difference between the BMW cylinder and Maserati one is the hose connector location. In BMW it is pointing left while in Maser it's down. That was not an issue because a short extension tube bent down fixed this problem. There is enough space sideways behind the strut tower for that. It is slightly more difficult to get the cylinder in place but was doable. |
| |
The new cylinder with the extension tube above.
Connectors are the same as in most German cars |
| |
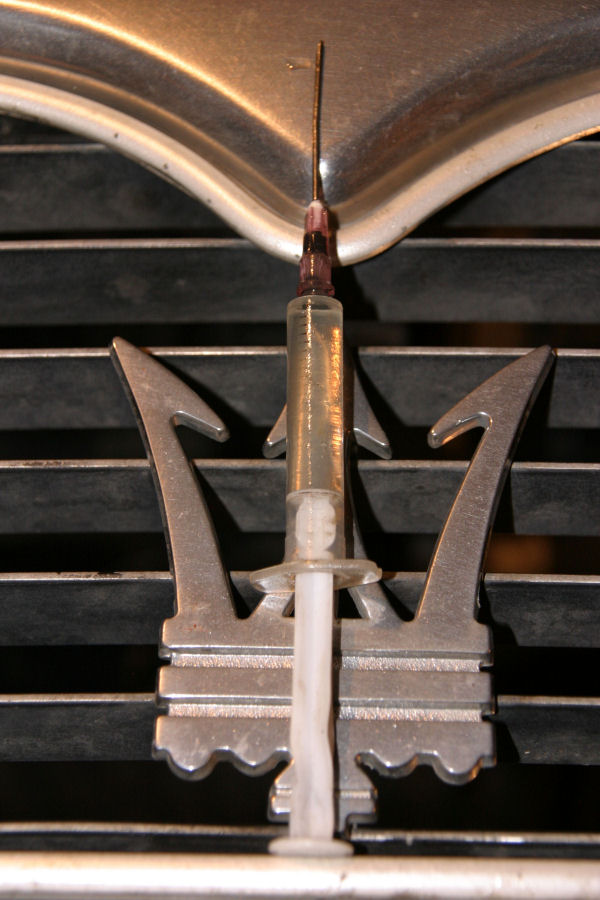
Both BMW and Maserati clutch hydraulic systems have a reputation to be notorious to bleed all the air out. Both systems are ridiculous because the only bleed screw is in the slave cylinder much lower than the master cylinder and because the master cylinder only has a tiny hole to the reservoir tube. I experienced no problems by pre-filling everything in advance with an injection needle. Although you eventually spill some brake fluid in the engine bay, it's worth pre-filling the system because there is not much air left in the system this way and the clutch works right away. Otherwise you may have to wait overnight for the system to bleed itself through the tiny hole. |
| |

Hyperdermic needle - a priceless tool for a Maserati mechanic |
| |
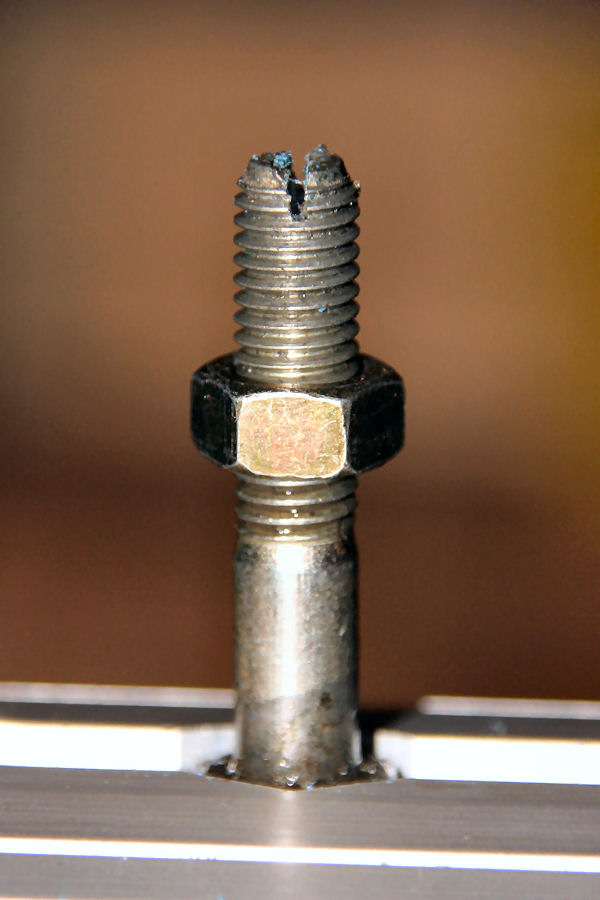
I made my life a lot easier by replacing the nyloc master cylinder mounting nuts with normal ones and locking washers and by making slots to the bolt ends for a screwdriver. With these modifications it was possible to tighten the bolts from inside the car without a need to try to get a socket wrench to stay in the bolt ends in the engine bay behind the strut tower. |
| |
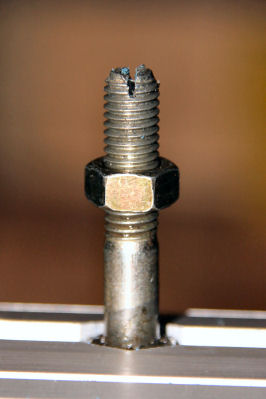
Modified bolt |
| |
RUST
For a good reason Biturbos are known to rust easily. My car is an excellent example in that sense as it hasn't been treated as it deserves and that shows. I can't complain however. If the car had been in any better shape I couldn't have afford to buy it. Worst is the passenger side door which has many holes. To prevent it to get any worse I wire brushed all rusty spots (meaning the whole underside of the door) and sprayed rust prevention wax to the door and painted outer panel rust spots with black rust primer. I don't know why but the driver side door is flawless.
To my luck all new cars in the 80's were required to have corrosion prevention made according to a local SFS standard to get them registered in Finland. Even Toyotas fulfilled the requirements right out of the factory, Maserati didn't. Therefore my car has had underbody protection sprayed and cavities waxed by a specialist in Finland. This has helped because the underbody is pretty much rust free. Body panel rust is more a cosmetic problem and as this car is far from a design classic, rust spots don't make it much uglier.
STICKY THROTTLE
I got tired of the throttle being somewhat inaccurate. It makes it a bit harder to drive on snow if you can't control the amount of slide with the throttle precisely. Actually the throttle had once stuck on wide open position after flooring it on second gear. I had to lift the pedal from the floor with my right foot. Was a bit close call because it happened just some 200 meters before a 90 degree turn... I thought I just have to oil it, wrong again. The outer cable had broken where it mounts to the throttle body and the inner cable had eaten its way through the plastic core into the outer cable metal. Half from the inner cable wires had worn cut and the cut wire ends were sticking in all directions inside the outer cable. I decided that 50% was enough and disassembled the cable and removed the damage wires. To prevent the outer cable to break again I installed a spring to the throttle body mounting point around the outer cable to prevent the cable to bend too tight. After the cable was fixed the throttle felt totally different and also seems to hold. I also adjusted the pedal movement limiters which obviously hadn't been done at the factory. That had caused unnecessary strain to the cable because whenever floored, the throttle body was limiting the pedal movement via the cable. |
| |
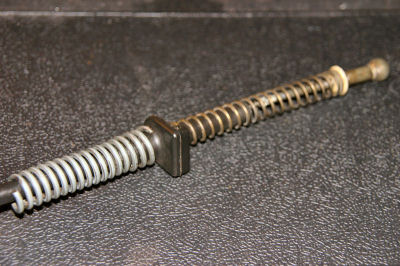
Throttle cable end. Left spring is to prevent the outer cable bend too tight. |
| |
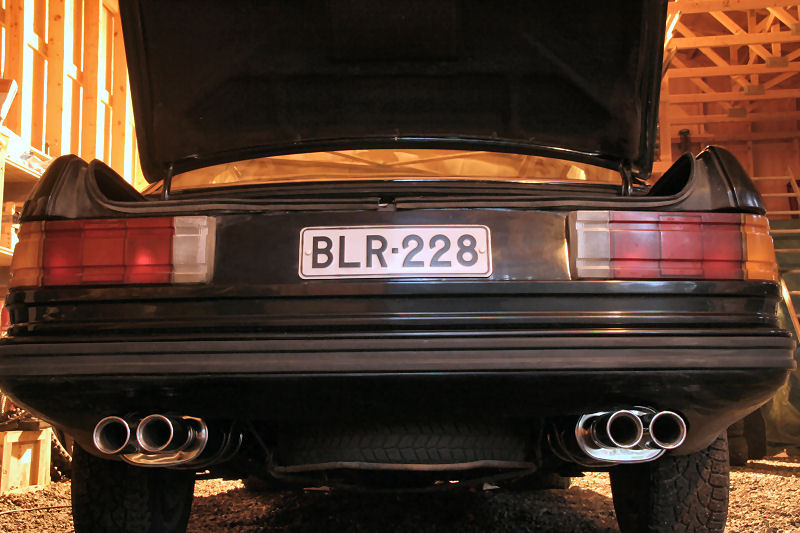
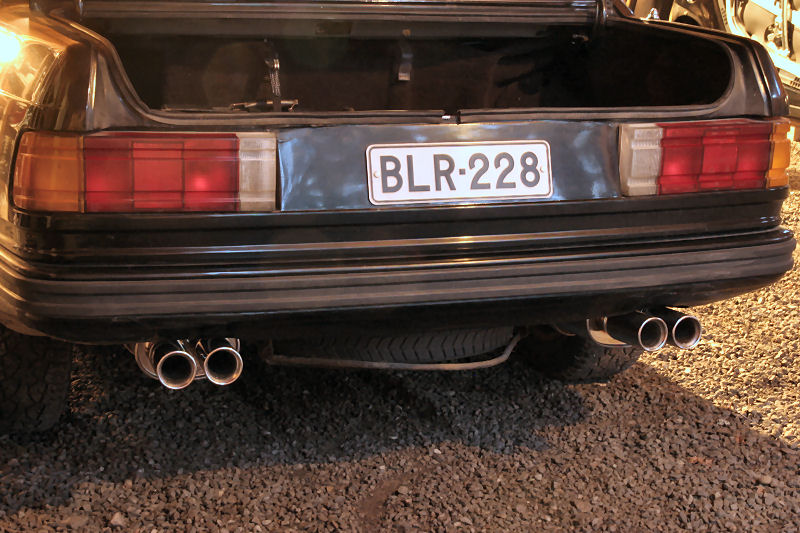
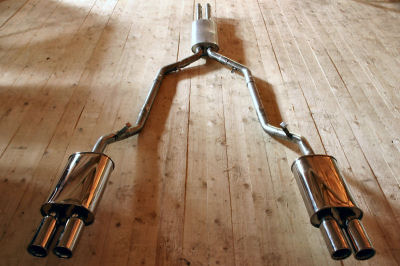
February 2008: ROTTEN EXHAUST
I had noticed the car to get louder every day and knew I had to patch a hole somewhere. Quick inspection revealed that the left rear muffler was almost cracked loose but luckily is mounted from three points so it was not in a risk of falling down. I had already made a short tube to weld on the cracked tube before I took a closer look. Once again I had been too optimistic, the exhaust (made by someone) was rotten badly. Numerous tiny holes and cracks all around in addition to the loose muffler.
Because everything excluding the donwpipes had to be renewed, I opted for stainless steel. Although much more expensive, it saves money in the long run assuming the car is still around for a few years. As a result of numerous hours online resulted in ordering necessary 2" tubing and a twin tube front muffler from A-Alt. Avgassystem and two dual exit polished rear mufflers from Motonet. Many more Googling hours and eventually a visit to a welding shop got me 0.9 kg of stainles steel flux core MIG welding wire to use in welding gear I borrowed from my friend's brother.
It took a good two and half days of work to manufacture the exhaust. To be sure everything fitted perfectly I assembled the exhaust and tacked everything together underneath the car before taking it off to weld it properly. I did not weld rear mufflers to the tubes so that it is possible to replace them easily if necessary. Another non-welded join was left after first two bends so that only a part of the exhaust needs to be uninstalled to reach the driveshaft. |
| |
The method of transporting professional
welding gear with a Biturbo |
|
New exhaust finished
|
| |
New exhaust fitted |
|
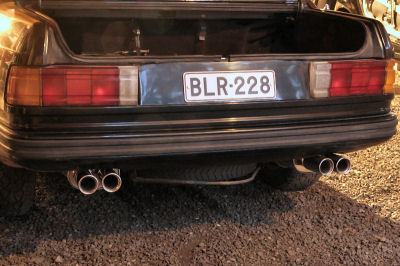
Looks somewhat different than the old rusted juice straws |
| |
Straight through mufflers are the best flowing so that's what I bought. The downside of high flow is of course loud sound. The system damps high frequencies quite well but the lowest tones quite a lot less.With the new exhaust the car became somewhat louder and definitively got a much deeper tone than with the old exhaust. At least all the buzz and whizz of the leaks were gone. Listen what it sounds like now !
Total cost for the exhaust was 570. Quite a lot, although italiancarparts(.com) lists stainless exhaust for a 228 to cost US $1,879.
March 2008: FOG LIGHTS
Not a single problem. I thought that finally I get a full month without any problems with the car. I would have if there hadn't been a blizzard at the end of March. Heavy snowfall made me to try if the fog lights would have improve visibility that night. Of course the only time during the whole damn winter there might have been a marginal benefit using fog lights they didn't work. It turned out that the fog lights were connected to the same powerline the driving lights originally used to. I had already re-wired driving lights to an extra fuse box I had installed. That had been a wise decision as there was no power coming from the original fuse box so the driving lights would also have been long dead. Now the fog lights connect to the same cable as driving lights.
April 2008
Gearbox repair costs were reduced by 90 . One BMW 2002 racer bought the rest of the gearbox. He's got an interesting project building a five speed gearbox for his Schnizer F2 race engine (based on BMW block I think) He had already bought a Biturbo box from Italy and he's going to make a Maserat/BMW hybrid out of those two with custom gears to make the first gear ratio 2.3 and fifth straight. The ZF might suit better to that engine than to a tourqy 2.8 Biturbo. The 70's Schnizer makes a respectable 300+ naturally aspirated horses which the big ZF gears should handle. Most likely the max torque though is less than in a 2.8 Maser and since the first gear ratio is really tall, the first gear synchro hub should be OK as long as takeoffs are made cautiously. My gearbox fix now sums up to 50
SHIFTER TWEAK
While the gearknob once again went loose and started that horrible rattle i decided to look things more closely. A test drive without the knob showed some rattle although less than with the knob properly tightened. Next I opened the plastic connection below the knob. What is hidden inside are two O-rings so actually there is only rubber connecting the upper and lower part. I must admit I had been partially wrong claiming that soudaseal would fix rattles. It might if the original plastic pieces were removed. That however would make the gearchange feel slobby like in an ordinary car. So what causes the rattle? Well of course the vibrations from the gears is the simple answer. But what seems to amplify it is a notable slack in the ball joint inside the shifter casing. To reduce that slack I forced some aluminum foil between the plastic socket and the shifter casing and put a piece of thin rubber from a bike tube on top of the plastic ball on the shift stick. All this effort did not make the shifter completely noise free but now you can hardly hear it and only on certain rews on second gear if you really concentrate. I don't notice it at all anymore. Unfortunately I didn't take any pics.
May 2008: CHEAP-ASS DIFFERENTIAL SPLINE FIK
Weather now being good enough for taking out my -65 Ford I opened up the diff extension to fix the worn diff splines. As suspected the soudaseal hadn't held and the coupler was moving free again. During the winter I had considered many options how to fix it. I decided to take a risk and have the coupler and grooved union welded together. Anyone familiar with the diff knows that the parts cannot simply be welded together because then you can't tighten the union on the pinion axle the tightening nut then being hidden inside the coupler. What I realized was that there is enough space inside the coupler for a socket and the small end is large enough to put a wrench extender through and therefore the union nut can be tightened with the coupler welded on the union.
So off I went parts in a bag to my friend's brother who welds oil rigs for his day job. I had bought the necessary 30 mm socket and shorted it a bit with a grinder. In english he's comment after I had explained my intention would have been something like "I've sure done all kinda backwoods hillbillyfixes but sure ain't done this kinda thing before!" What I had decided was to weld the socket to the washer under the axle nut so that the nut itself remained free inside the socket. |
| |

Slightly shortened socket welded
to the washer and the nut inside
|
| |
This done we positioned the union to the coupler and welded them solid. |
| |
The new coupler union |
|

Notice the nut/socket inside |
| |
As soon as I started to install this wonderful piece of grassroots engineering, I noticed one tiny mistake made with the welding. It should have been done in small increments to prevent the union to get too warm and deform. The weld being done in just a few passes had shrunk the splines a bit and it was very reluctant to get onto the pinion axle. with a help of a prybar it finally did get in enough for the nut to reach the threads. The next time the couplerunion removal will require an extractor. I also had to make a custom wrench extender just long enough to reach the socket but short enough for the wrench to clear the subframe. Actually the diff had to be dropped hanging from the rear mounts to get enoug clearance from the subframe. |
| |

Tightening the coupler union. Just
barely enough clearance from the subframe |
| |
You can imagine how nervous I was running the car the first time after I got everything back together. Apart from all those familiar small whines and clonks all over the driveline, it seemed to work as it should. No virbrations and so forth. I'm not sure if some small odd noises were there beferore though. Only time will tell what happens. Of course one joint being removed any misalignment has to be corrected somewhere else that most likely being the small end of the coupler. Or it may wear the pinion bearings, or it may last for good. Time will tell...
September 2008: NOT A SINGLE PROBLEM ?
I'm amazed. Not a single problem since May and still counting! (Knock on wood :)
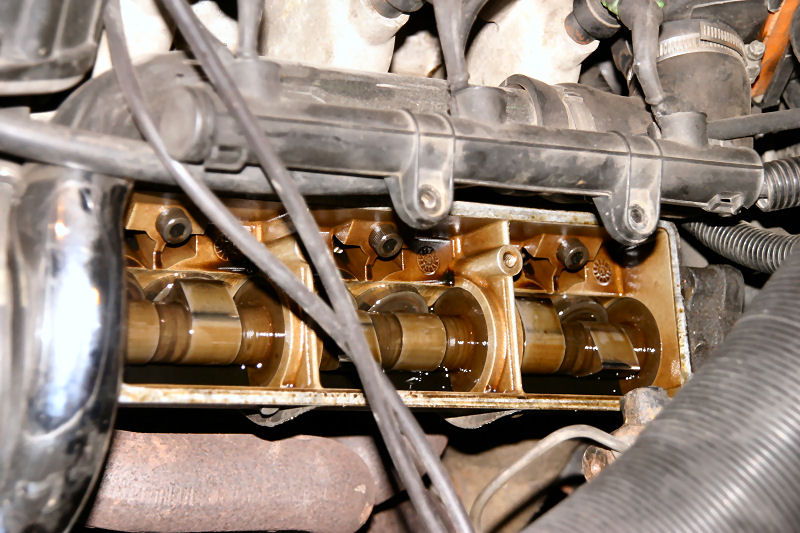
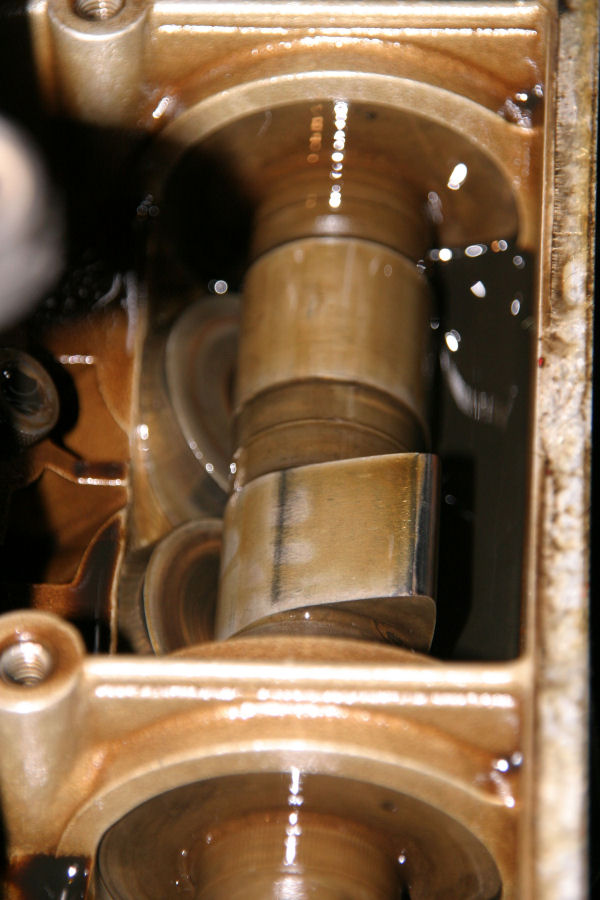
VALVE CLEARANCE
I'm one of those "If it ain't broken don't fix it" - people and was slightly reluctant to check the valve clearances just because the maintenance schedule tells you to. The engine noise didn't incicate any need to adjustment either. The clearances could not have been much better. All intakes were more or less exactly .35 mm. One exhaust measured .50 while all others were .45. I'm a bit confused what the clearance should actually be for my engine. The repair manual says that for engines 2000 Si and 2800 the clearances are 0.30 ÷ 0.35 for intake and 0.40 ÷ 0.35 for the exhaust. For other three valve engines the dimensions are clear: 0.35 and 0.45 both with ± 0.04 mm tolerance. But what on earth does that division mark mean? Maybe as an engineer I should know but I don't. Especially for the exhaust the dimension is unlikely to be marked inversely from .40 to .35 and I think it's as much unlikely to be a plus mark meaninga a clearance from .40 up to .75! Maybe it should read .40 - .45. In any case no need for adjustment. Visual inspection did not give any need to worry either, just a bit of polished surface on the cams. If those cams have seen more than 100 000 km of spirited driving, they have survived very well. |
| |
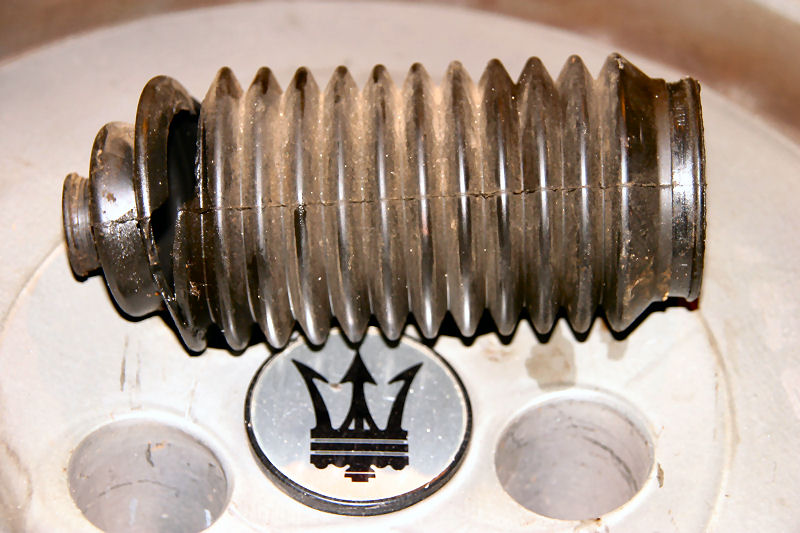
A generic tie rod boot: EURO 4.
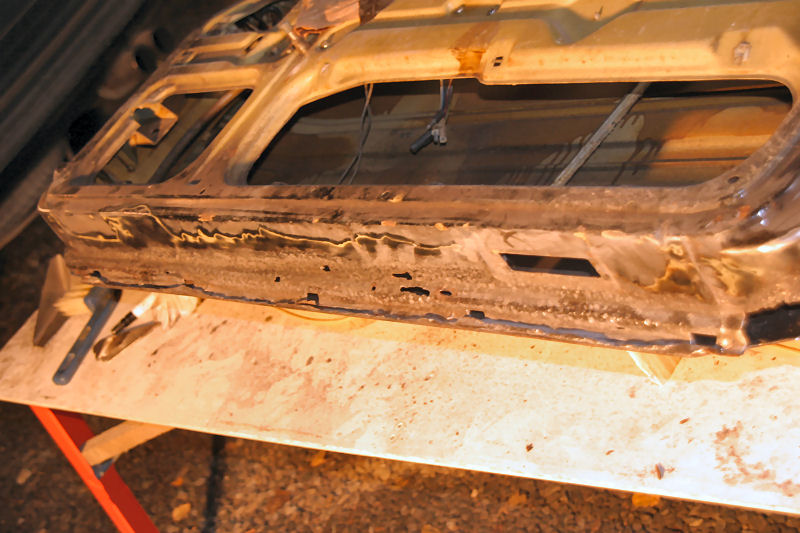
October 2008: DOOR PATCH
Usually a rust damage seems much smaller than what it really is. The passenger door was no exception. Not only had both lower corners disappeared, also the bottom panel on the door proved to be full of holes. |
| |
Not a pretty sight |
|

More work |
| |
The fix was just a lot of work. New corners were bent from fresh 1 mm thick sheetmetal. A local metal shop made a new bottom panel to match a piece I had cut away (10 for a while u wait -service!). Took a full days of work to cut, grind and sand the door and to make the new pieces. New bits were then welded in place by my friend's brother. Three hours of intense welding earned him 50 and a promising start of a garage fire. It took one more day to sand all weld seams flat wherever they could be seen and to paint everything with flat black Ferrex rust preventive primer. I also applied windshield glue on the outer panel seam as there originally is glue on the seam. Pretty much all steel doors have the panel seam glued which often allows water to find its way to the seam from the inside of the door. To avoid that I also glued the seam from the inside hoping that this way the water never gets to the seam. Windshield glue was my choice because it's strong - and it dries in 20 minutes. After the primer paint had dried in a 80 °C sauna and the seams had been glued, the inside of the door got a thorough wax treatment before the assembly next morning. The door would of course have needed a topcoat after smoothing out the outer panel but many other rust spots in the car need fixing too. Flat black primer is discrete enough. |
| |

Rear corner repaired |
|
Front corner repaired |
| |

Bottom panel and the rear corner repaired |
|

Bottom panel and the front corner repaired |
| |

After painting |
|
All done ! |
| |
PARKING LIGHTS
Originally the parking light switch on the steering column lights either left or right parking lights depending on wich way the switch is turned. To the best of my knowlege the original installation has been approved by Italian type approval authorities according to Technical Regulation no. 48 of United Nations Agreement concerning the Adoption of Uniform Technical Prescriptions. This agreement has been signed by pretty much all European countries, including Finland. According to it all members should accept motor vehicles type approved in another member nation without any modifications. I don't know why but Finland hasn't. Therefore the wiring had been modified by the local dealer so that the rocker switch lights all four corners regardless which way it's turned. I had previously removed that modification because it was not well made, just a bandit connector that slices through two cables connecting them. Now I was forced to make the same modification again, this time properly. At the inspection the switch hadn't done anything but now everything worked as it should. All well I thought...
SECOND ATTEMPT
Headlights were quickly adjusted and the rear diff only seemed to leak a drop or two while driving, none when parked so I just wiped the diff. Everything fixed I headed back to the inspection station. Just to be sure I tried the parking lights before going inside. I was slightly shocked as nothing happened. It had all been ok the day before but now...
I thought that for once the arsenal of tools I keep in the trunk came useful and I could fix the problem. After removing the plastics I discovered that there was some contact problem in the wiring loom as the power to the rocker switch was going on and off when pulling the wires. A few minutes later I had a new wire from the ignition lock to the switch and all seemed to be ok so I went in. Coming out 19 poorer to wait my turn I turned the key but nothing happened. For some reason the main power fuse had blown. New fuse in and all ok. The inspector waved me to drive in so I turned the key to star the engine, no cranking. Few attempts later I popped up the hood. At this point the inspector came to the car slightly amused, even more so when I put the engine to life with my house key from the engine bay. In to the inspection building and engine off to try the parking lights. What happened was that it was as if the ignition had been turned on, except that after a second the fuse blew again. It was quiet at the station and the inspector said I could try to fix the problem. So I opened the darn thing again thinking that I had put a mounting screw through the cable. I hadn't and I couldn't find the reason to the fault. Therefore my registration document got a notification to fix the fault before November 5th.
Back home the following day I started to look for the cause to this funny problem that I could not imagine to occur in any other car make. I discovered that the wire to the right hand parking lights lit all parking lights when the main light switch was off. When on, power to that cable caused everything to turn on, even the climate control. I thought that I could get around the probelm by wiring the parking light switch to the main light switch so that all parking lights and also instrument lights could be turned on without the key. This however made the same things. I don't know why but I tried one more time to power the right hand parking lights and to my surprise everything was back to normal. For some reason the problem had just disappeared and wouldn't return no matter what I did, so I just put everything back together. After a few days of driving it was still working. I could only hope that the problem doesn't reappear. I couldn't care less if I can't switch the parking lights on without the ignition key but since I got a notification on my registration document, I could get fined by the police if the switch doesn't do anything.
SCHEDULED MAINTENANCE
A year without needing to add a drop of oil into the engine! Oil and filter replaced with the same products as removed.
New spark plugs were also on the list. The engine had become slightly lazier to star which new NGKs fixed. Surprisingly time consuming as it is hard to get a good grip on the plug caps for pulling them out.
January 2009: DOOR FIXES
I got fed up of rattles on both fron doors. Also the right hand door lock was sticky and therefore the central locking servo couldn't lock the right hand door. That prevented from locking the doors from the left hand side. Whenever attempted, the system pushed both locks back open because the right hand lock wouldn't close. Most rattles were damped by adding rubber hose on the steel bars running to the inside door handles and lock knobs. The lock needed a bit of adjustment and grease.
Left hand driving light bulb replaced.
February 2009: SLIPPING BELT
I thought that the alternator was starting to give up when all lights started to dim while driving on the narrow road to my home. Then I realized this happened each time when driving through deeper snow on the then unploughed road. The belly pan scooped snow into the engine bay wetting the alternator belts causing them to slip. Tension adjustment fixed this one.
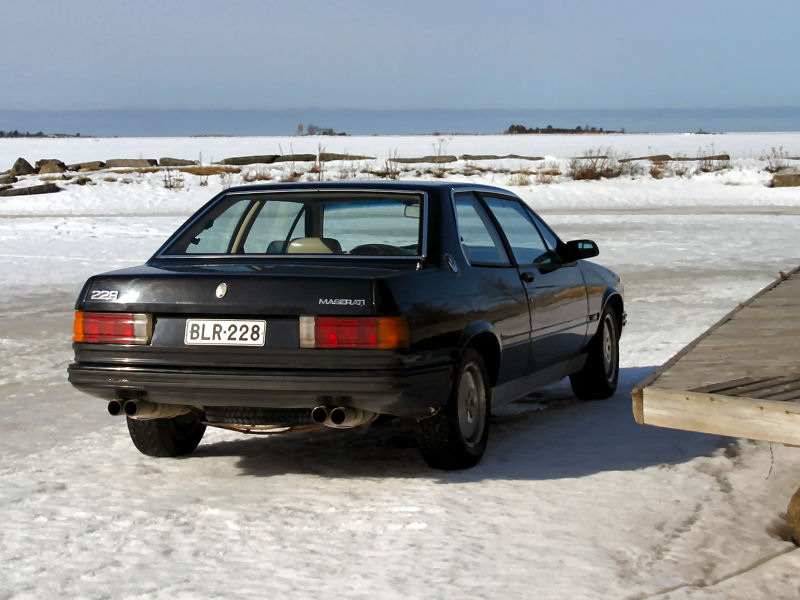
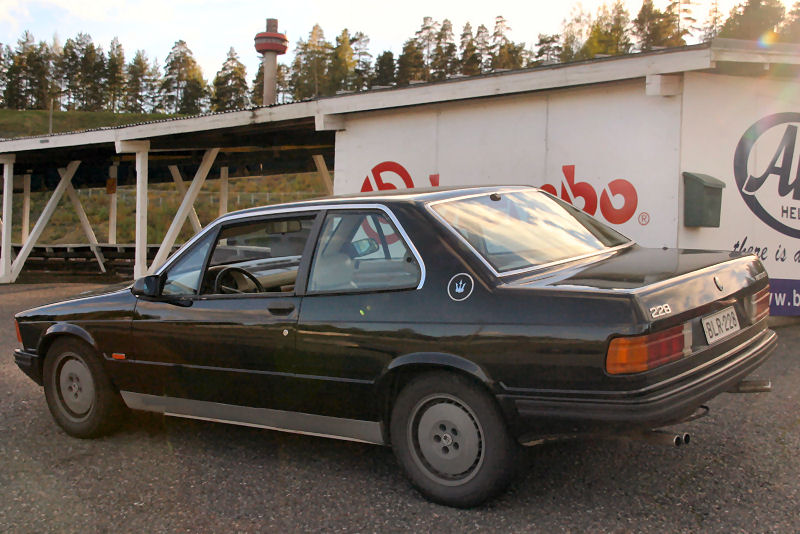
March 2009: MASERATI ON ICE
Although this has nothing to do with any maintenance or repair, not many Maseratis have been driven on frozen sea. Mine is one of those (un)lucky ones so here's a picture of such occasion. |
| |
In front of the boat house one sunny day
|
| |
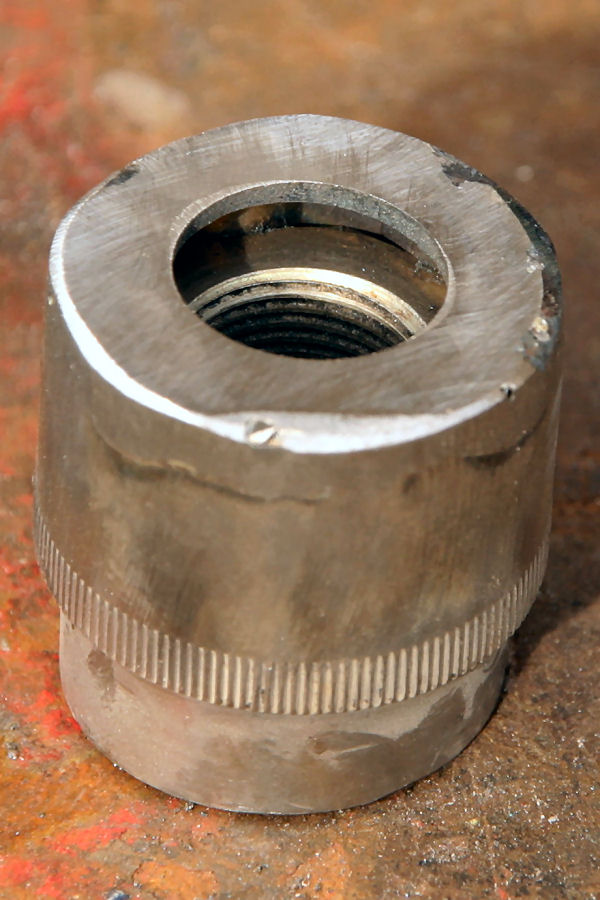
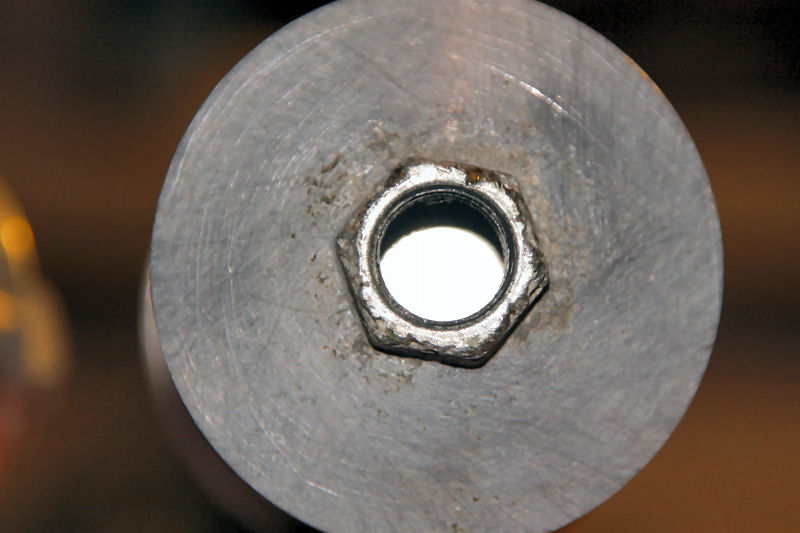
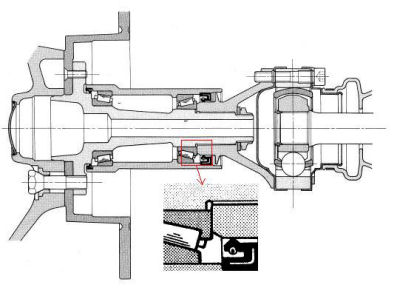
April 2009: ADJUSTABLE BEARING IN AN UNADJUSTABLE HUB
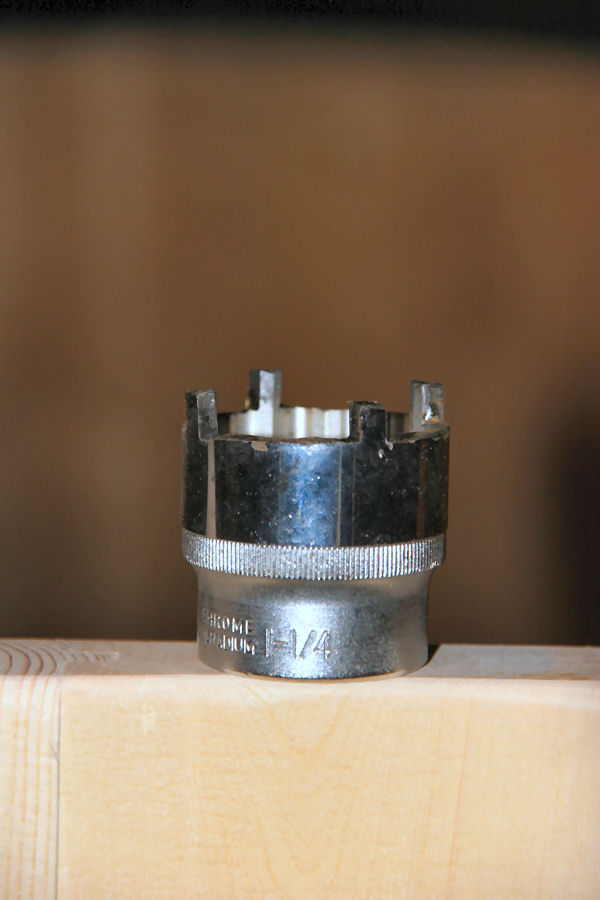
What a great proof of Italian engineering excellence. The right rear wheel bearing had a slight slack which I decided to fix. Occasionally there was a resonating howl when taking off. It sounded like the emergency brake shoes touched the drum because of a slight movement of the drum. The rear hub diagram in the repair manual indicated that by thightening the axle nut bearing, slack could be adjusted. So cv joint off to see that there was a slotted round nut instead of a regular one. My toolbox doesn't have Maserati special tools so I had to make one. A 1-1/4" socket was transformed into such. |
| |
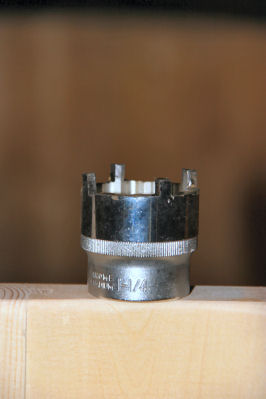
An angle grinder and 5 minutes transforms
a regular socket into a Maserati tool |
| |
I was amazed how tight the nut was. Finally with a 1,5 metre long extension the nut agreed to move. But the slack didn't seem to get any smaller. I kept turning until the nut suddenly became easier to turn. At that point I realized the threads had sheared. I opened the nut whcih now turned easily. Luckily it was the nut that had broken and the axle was intact.
What I discovered was that the bearing inner race was flush with the step on the axle, unlike the factory diagram suggests. Reading the manual it became clear that the nut should just be tightened to 147 Nm. Such a high torque is only achieved once the hub flange is against the step on the axle. It means that there is no adjustment possible. The factory had just trusted that the bearing dimensions are accurate and no adjustment is necessary, unlike in the front and most other cars. |
| |

Threads gone |
|
I'd say the picture indicates a possibility for adjustment |
| |
Luckily the nut is a standard M25X1.5 nylock so a new one was bought from a bearing retailer for EURO 5. I knocked the inner race with a hammer through a steel pin. A few easy knocks and the slack was gone. To keep the slack away (or at least smaller) I made a thin shim from aluminum foil and bolted everything back together.
All this trouble didn't even fix the noise I was after. The same resonance could be provoked just by turning the wheel by hand. The wheel moved freely so the brake was not jammed and I didn't feel concerned driving the car. The noise however is quit irritating and also embarrasing because it only occurs in very slow speeds, for example after stopping to let pedestrians cross the street. Opening of the drum was thus on the menu.
The hand brake shoes were quite worn out and improperly adjusted. One end of one shoe had worn to its end which caused the noise. A bit of shoe grinding and adjustment prevented metal contact. If it weren't a secondary brake, new shoes would have been needed. In this case, well, the brake is only used to keep the car in place.
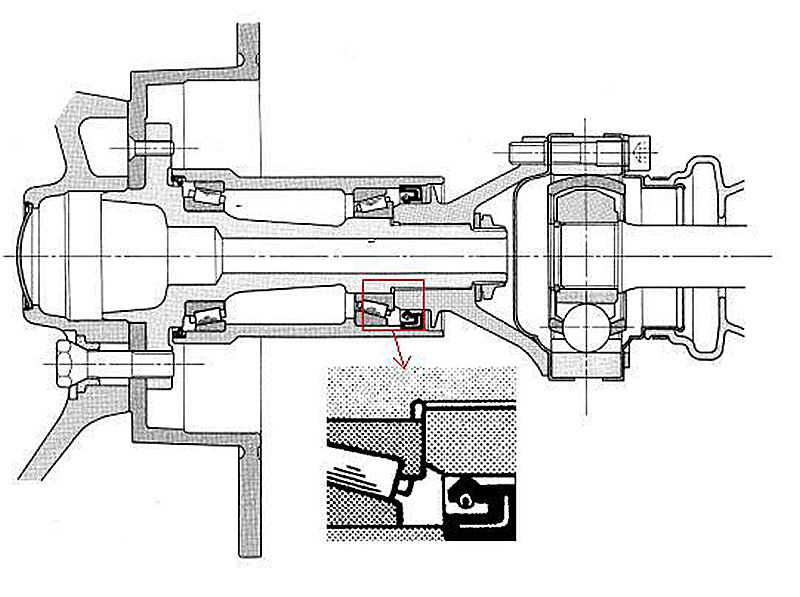
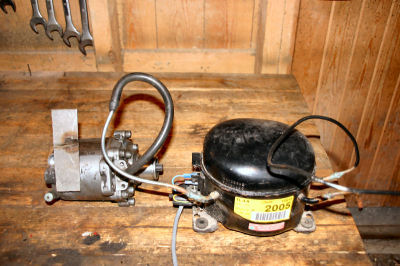
June 2009: AC REPAIR
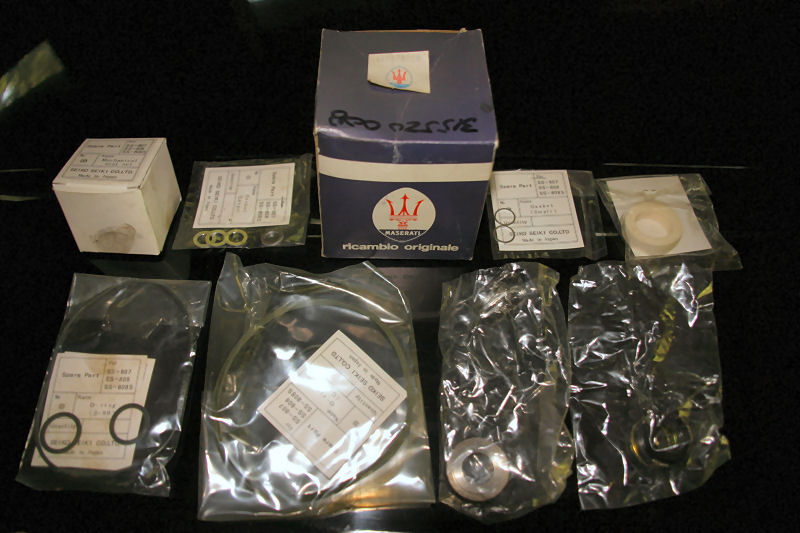
I bought my first Maserati original spare part and boy do I regret it! I had already noticed in March that the compressor was not engaging. It meant that the refrigerant had escaped. Pressure test revealed that the compressor shaft seal leaked badly. As I wanted to keep the car running until I had the necessary shaft seal, I started to look for spare parts for the compressor, which according to Biturbo Zentrum database was a Seiko Seiki SS-808P. I was unable to find anything other than original spares to this compressor. So although I was sure that I could find matching shaft seal by first opening the compressor, I decided to take the easiest and most expensive route and buy an original overhaul kit from Auto Italia. EURO 71 delivered.
Once I got the compressor off the car, I noticed the manufacturer plate claimed the compressor to be SS-170P. How I wished I had known this before. For that compressor Capitolsupply.com sells a shaft seal for US $17.79. I also found out that 89-92 Saab 900 has a SS-170PSS compressor which more than likely has the same seals. After all, the SS-808P kit was also an exact match. Probably all Seiko-Seikis of the era have the same internals and these compressors have been used by many manufacturers. |
| |
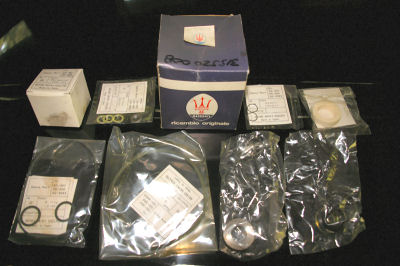
Maserati Original A/C compressor overhaul kit |
|

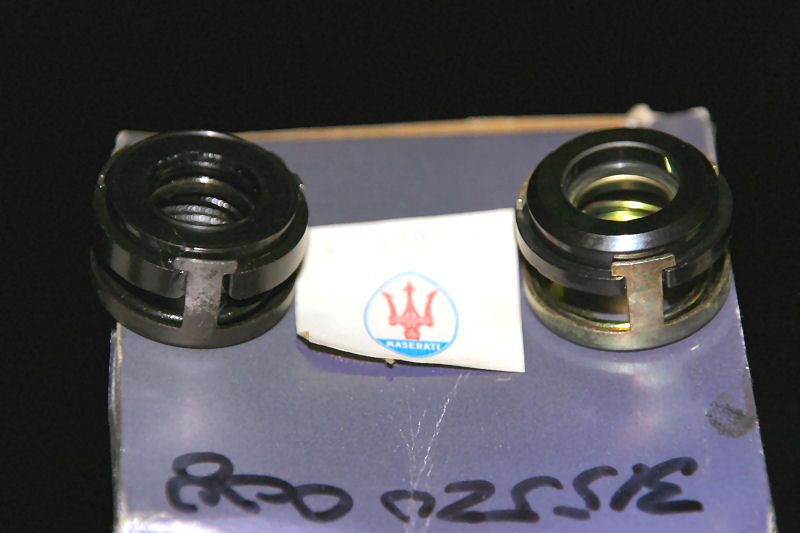
Worn out shaft seal from a SS-170P (left), new seal for a SS-808P (right) |
| |
The shaft seal was simply worn out. If I didn't have a new seal I would have just shim the seal and taken off a bit from the metal holding the seal bit. It would have given a few more years as there is still plenty of material left in the carbon seal after the original spring travel comes to an end.
While the compresssor was open a thorough inspection and clean up was in place. Luckily the compressor was in good shape. |
| |
Insides of a Seiko-Seiki SS-170P (SS-808P is probably exactly the same) |
| |
After reassembly (taking care that all moving parts had a coat of oil on them) a vacuum leak test was carried out with the most sophisticated equipment available in my garage. A compressor salvaged from an abandoned freezer was used to suck out all air from the a/c compressor. When all the air had come out, the vacuum pump was turned off. Then after 30 minutes the steel plate sealing one of the compressor outlets was removed to hear the sought after whizz. This indicated that the compressor had passed the test. |
| |
My state of the art A/C compressor DIY vacuum leak test |
| |
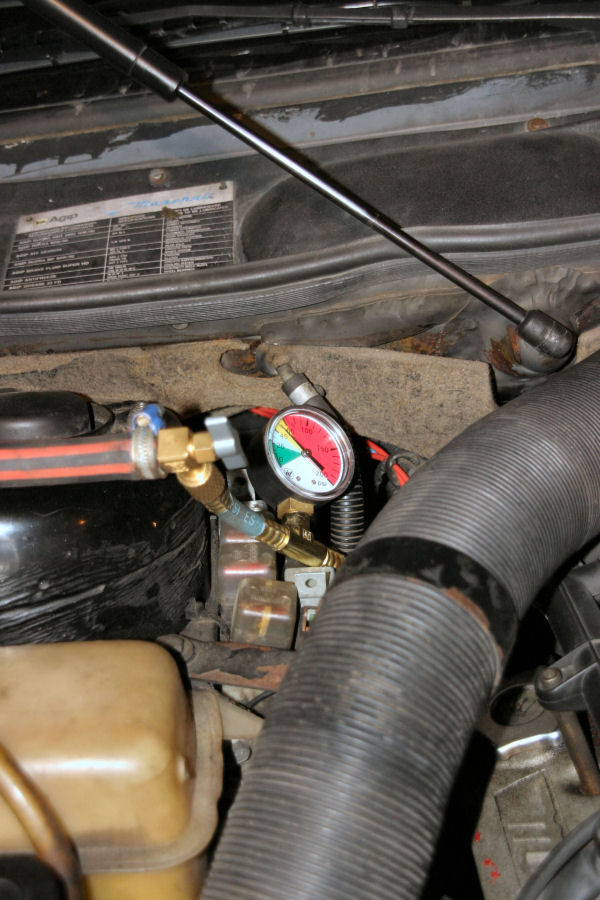
The compressor was then installed back to the car and a pressure leak test was done by putting air pressure to the system via a refrigerant top up adaptor. The top up adaptor was bought some years ago during a trip to the US, where you can buy these tools and refrigerants even from Wal-Marts! |
| |

Two hour test gave no pressure drop: Passed fit ! |
| |
Final stage before recharging with R134A and ester oil was connecting the high-tech vacuum pump to the adaptor for a few hours to get any air and moisture out of the system. After the system was recharged and belt tension adjusted the a/c worked like a charm. Outlet air temperature was 8 °C ambient temperature being around 18 °C. Certainly enough here in Finland where temperatures very rarely exceed 25 °C.
July 2009: CLIMATE CONTROL LOST POWER
Of course it happened during rush hour in the middle of a city I barely knew. And it was raining heavily. The windows got a layer of mist on them pretty much instantly so trying to spot a place to pull over was a bit tricky. The fuse box had quit giving power to the climate control fuse. A temporary fix was to connect the next fuse, fog light fuse, to power the climate control for the day.
Once back home a relay enhanced wiring fixed this issue. Hardest part in this was to locate which wire coming out of the fuse box powered the climate control. It's not simply that you find out what is the color of the power wire behind the control unit and locate the same wire on the fuse box. There's a connector on the way there and the color changes.
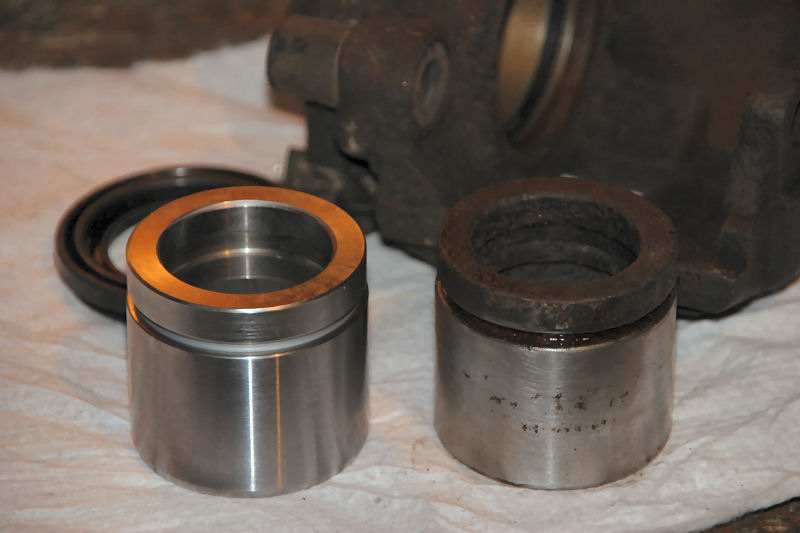
October 2009: EMPTY SHOCK
The right front shock absorber had given up during the summer and paying the original spare part price was not my intention (what a surprise!). Unlike in the older Biturbos, this car doesn't have the cartridge type strut in which an interchangeable part can be sourced from Bavarian Motor Works chassis types E12/E28.
Taking off the strut from the car was a surprisingly easy task. After everything was dissassembled the shock absorber was gutted by cutting off the lower end. My plan was to either find a strut that fits or find a cartridge that would fit inside the original strut tube. My trusted spare part shop guy had an idea and called to a friend of his in a spare parts shop in the nearest city. This friend confirmed that they had a pile of unsorted shock absorbers and welcomed to have a look. The biggest cartridge in that pile was just perfect and it didn't surprise me that it was made for the E12 Bavarian. 30 Euros turned me to the owner of this shock and a modified washer from a Jaguar front shock absorber and a 5 mm aluminum sheetmetal spacer made the cartridge to fit exactly inside the original strut tube.
All rust was scraped from the strut tube and then painted before reassembling everything. A shock absorber test at the annual inspection gave just 2 % difference between the left and right shocks. The left shock didn't have any signs of leaks so it remained untouched. Apparently it wasn't put on the car the same time the right one had been because it had a bracket the right one didn't have. |
| |
A BMW E12/E28 cartridge fits perfect inside the Maserati 228 strut tube |
| |
FUEL FILTER LEAK
On todays clean fuels, filters don't get clogged so changing them is very infrequent. Hence the filter hadn't been changed in who knows how many years. One day I noticed a fuel smell and looked under the car to find that fuel was dropping from a connector in the well corroded fuel filter. The filter was reluctant to come off the car as the bracket bolt was jammed and only came off after it had snapped. The filter seemed completely ordinary with threaded hose connectors in both ends. I took the leaking connector off the filter and found out that the aluminum shell had corroded through causing the leak. I took the filter with me and bought a new one which appeared to mach. It turned out that it didn't. The hose connectors in the old filter were of two different sizes and the new one had the same size threads on both ends so only one connector fit the new filter. I guess only Italians can make a filter which has hose connectors in both ends for the same size hose but different threads!. Back to the shop where a connector to mach the new filter was found from a boat accessory bin. |
| |

New filter by Bosch. The old one by Weber Marelli, who else ? |
|

Corroded through |
| |
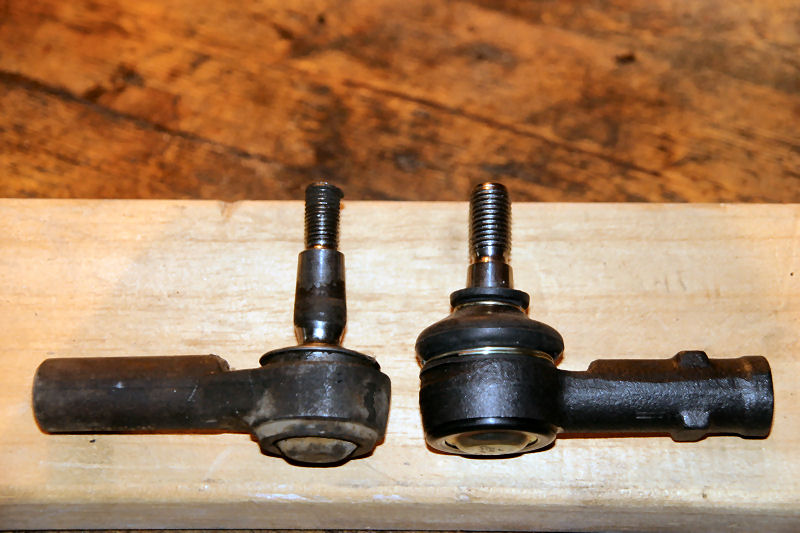
STICKY BRAKES AND SO ON
The annual inspection gave three faults. Uneven front brakes, right hand outer tie rod end and too high CO emissions.
For the first time with this car, I could just go and buy new parts without guessing what fits. Brake parts from an E28 and tie rod end from a Mk1 Golf. Both fit perfect.
One brake piston had corroded and both needed new seals. A simple disassembly, cleanup and reassembly with brake lube made the brakes like new. Even all high speed brake judder disappeared. |
| |

Brake parts from an E28 are exactly the same. |
| |
New bits in and back to the inspection station a week later. I had found nothing that could cause the CO value to be 4.5%, 2% above the factory setting and 1% above the limit. I was allowed the few minutes it took to turn the CO adjusting screw until the value was at its factory value. CO had also been a bit high in previous inspections but below the limit. My theory is that the ECU over-compensates for the cold weather a bit. At previous inspections the weather had been some 20 degrees Celcius warmer.
February 2010 : STARTER CIRCUIT
After a long period of problemless operation an intermittent problem on starter cirquit emerged. The starter motor didn't turn every time the ignition key was turned. The problem always fixed itself by shaking the cables on the steering column. After a couple of weeks I got fed up and opened the plastic covering around the column. The problem turned out to be a connector in the wiring loom having minor oxidation. Thus the problem was quickly fixed.
SEAT MOUNTS
I noticed that the driver seat had become a bit wobbly. It turned out that the left front seat mount had cracked loose from the floor. It wasn't even rusty, the floor beam just is made out of approximately 1 mm sheetmetal, way too weak by todays standards. The mount was welded back with a reinforcing out of 3 mm thick piece of sheetmetal to avoid any further fatigue cracks. The right hand front mount also had a small crack so that was also welded. The seat had not been very far from being completely loose from the front end. A dangerous scenario if the car gets rear-ended by another vehicle. The driver would have ended head first into the rear seat with a good chance of a neck injury.
A HIGHWAY INCIDENT
Driving home after fixing the seat at my friends garage I had a scary incident. At full cruise speed on a completely dark highway all lights went dead without any warning. The road surface being covered with snow and ice I couldn't just slam the brakes but had to gradually slow down. Luckily I didn't drift off the road or even the lane. More luck was that the brake lights worked so other drivers could see me before I found the emergency light switch. I couldn't see the switch because all dash lighting was also gone so it took a few seconds to find the right switch. With just the emergency lights and occasionally other cars lighting the highway I was able to drive for some 100 metres to a bus stop where I could safely investigate the problem. A mere touch to the fuse box restored everything back to normal. Further shaking of the box didn't give any further indication of a bad contact so the drive goes on.
May 2010: THE END
At least from my part. I regret to tell that I have now sold the car after three years of ownership. The car gave me experiences that not many cars can bring, some good and some, well, fun to remember afterwards. But at least there has been experiences, not just dull unmemorable miles.
My website at http://kmrvehicles.com should stay up and I continue to answer questions whenever such comes up. |
| |
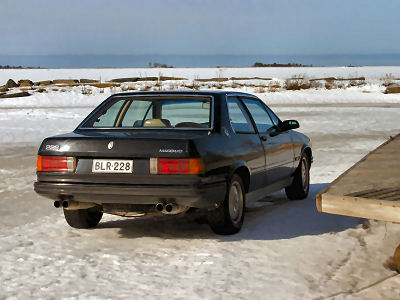
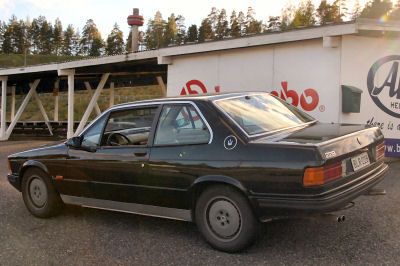
Klaus' Maserati 228 |
|
|
| |

|
|
|
| |